Knock out these must-do fall home projects in just a couple of days and enjoy care-free living all winter long.
Every editorial product is independently selected, though we may be compensated or receive an affiliate commission if you buy something through our links. Ratings and prices are accurate and items are in stock as of time of publication.1 / 51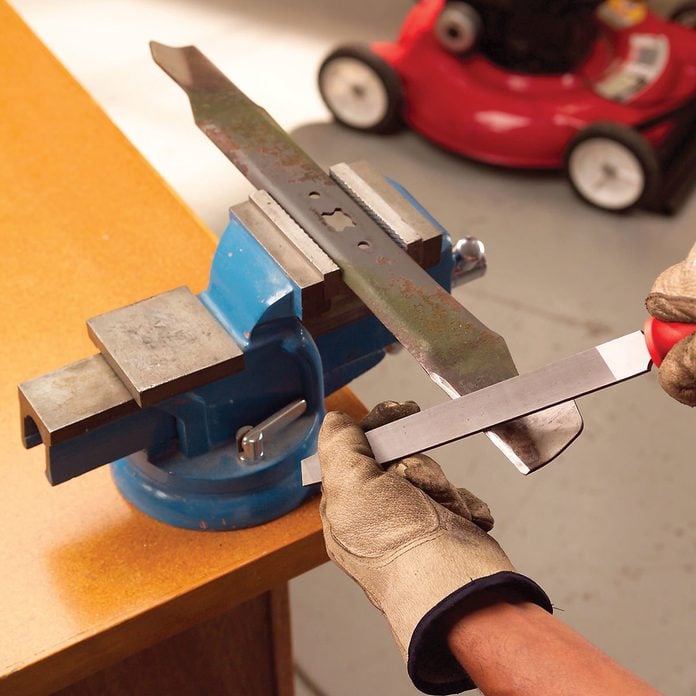 FAMILY HANDYMAN
Sharpen Lawnmower Blades
The hardest part about sharpening a lawnmower blade lies in detaching the blade safely from your lawnmower. Once safely removed, clamp it into a vise. Then, a good file is all you need to refresh the blade’s edge. Just make sure to sharpen the right side of the blade! When detached, it can sometimes be difficult to tell which way the sharpest edge is facing. Get complete instructions for sharpening lawn mower blades in our tutorial. PlusMake This Coat and Mitten Rack
The design of this shaker style coat and mitten rack is easy to build with butt joints connected by screws that get hidden by wooden screw-hole buttons and wood plugs. The coat and mitten rack mounts easily to the wall with screws driven through the hidden hanging strip on the back. The five large Shaker pegs are great for holding hats, umbrellas and coats, and the hinged-hatch door at the top keeps the clutter of gloves and scarves from view. You can build this project in a few hours, with an additional hour needed to apply a finish. Here are instructions for how to build this project.4 / 51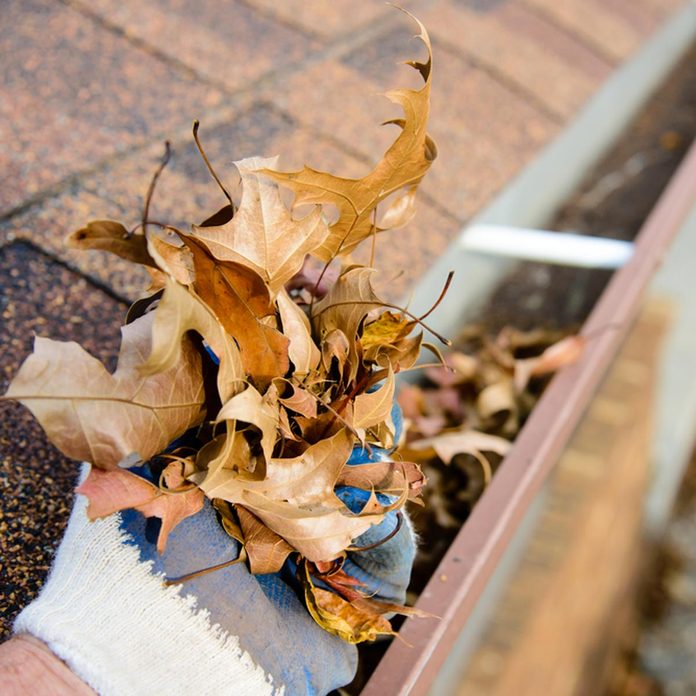 JOHN E. HEINTZ JR./SHUTTERSTOCK
Clean Gutters
Clogged and overflowing gutters can create a drainage problem over the long winter months. It will also encourage rot to form at the roof line. For this messy job, wear gloves and practice ladder safety while working. Plus, here are the best gutter guards for your home.5 / 51 FAMILY HANDYMAN
Build a Shoe Storage Booster Stool
Build this handy stool in one hour and park it in your closet. You can also use it as a step to reach the high shelf.All you need is a 4 x 4-ft. sheet of 3/4-in. plywood, wood glue and a handful of 8d finish nails. Cut the plywood pieces according to the illustration. Spread wood glue on the joints, then nail them together with 8d finish nails. First, nail through the sides into the back, and then nail through the top into the sides and back. Finally, mark the location of the two shelves and nail through the sides into the shelves. Don’t have floor space to spare? Build these super simple wall-mounted shoe organizers instead!ADVERTISEMENThttps://57cd6d63790a2a95f39d4c51bcc0115a.safeframe.googlesyndication.com/safeframe/1-0-40/html/container.htmlADVERTISEMENT6 / 51 FAMILY HANDYMAN
Closet Nook Shelves
Don’t let the recessed space at the ends of a closet go to waste. We love maximizing storage space by fitting these nooks with wire shelving to hold blankets, towels or bedding.
Wire shelves come in a variety of widths. Measure the width and depth of the space. Then, choose the correct shelving and ask the salesperson to cut the shelves to length for you. Subtract 3/8 in. from the actual width to determine the shelf length. Buy a pair of end-mounting brackets and a pair of plastic clips for each shelf. A pack of plastic caps covers the cut ends and keep them from snagging fabrics.
Plus: Learn how to triple your closet space.7 / 51 FAMILY HANDYMAN
Create This Swedish Boot Scraper
This traditional Swedish farm accessory cleans soles soiled by soggy springtime soil. Don’t worry about precise dimensions, but choose edges at the top of the slats that are fairly sharp. They make the boot scraper work. Cut each slat to length, then cut triangular openings on the side of a pair of 2x2s. A radial arm saw works well for this, but a table saw or band saw will also make the cuts. Trim the 2x2s to length, predrill, and use galvanized screws to attach the slats from underneath. If you prefer a boot cleaner that has brushes, check out this clever project.SPONSORED CONTENT
By TheWalletGuru — 2022 Best Gadgets8 / 51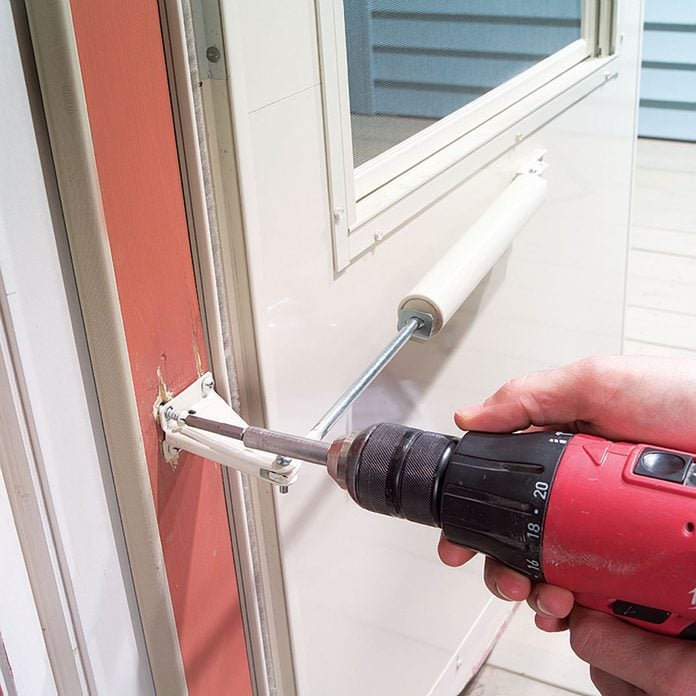 FAMILY HANDYMAN
Fix a Storm Door Closer
Strong winds or heavy use can crack the door jamb that holds the storm door closer in place. A jamb reinforcer can repair the cracked jamb, or stop the problem from happening in the first place. Learn how to fix your storm door closer here.ADVERTISEMENTADVERTISEMENThttps://57cd6d63790a2a95f39d4c51bcc0115a.safeframe.googlesyndication.com/safeframe/1-0-40/html/container.html9 / 51 FAMILY HANDYMAN
Fix a Door that Doesn’t Latch
When a house settles, doors sometimes stop latching properly because one side of the frame has sagged. You can fix the problem easily with a rotary tool and a metal-cutting bit. Follow these simple step-by-step instructions to get the job done right.10 / 51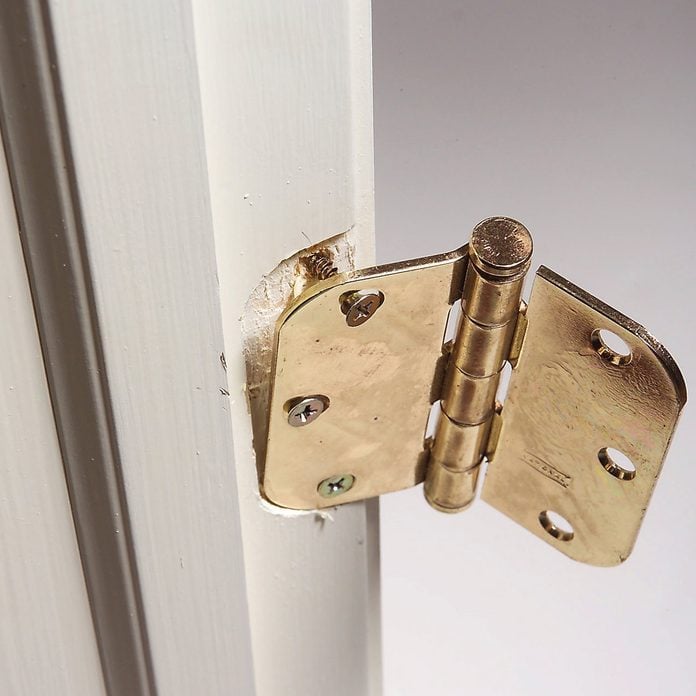 FAMILY HANDYMAN
Fix Loose Hinges
One day the door closes smoothly; the next day it sticks. And the sticking grows worse as the weeks pass. It’s a common old-house problem, but it can happen anywhere kids hang from doorknobs. The screws holding the top hinge carry most of the weight of the door and are almost always the first to pull out, especially after repeated tightening over the years. Here’s the best way to fix those loose hinges and beef them up.11 / 51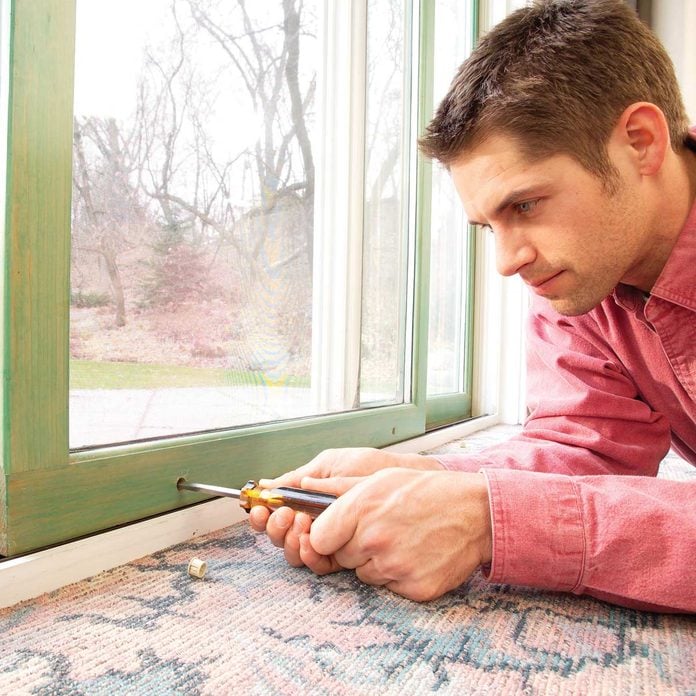 FAMILY HANDYMAN
Unstick a Sliding Door
Sliding doors get sticky and hard to open when the wheels slide out of adjustment or the track gets dirty. Here’s how to repair your sliding door and replace a flimsy screen.ADVERTISEMENThttps://57cd6d63790a2a95f39d4c51bcc0115a.safeframe.googlesyndication.com/safeframe/1-0-40/html/container.htmlADVERTISEMENThttps://57cd6d63790a2a95f39d4c51bcc0115a.safeframe.googlesyndication.com/safeframe/1-0-40/html/container.html12 / 51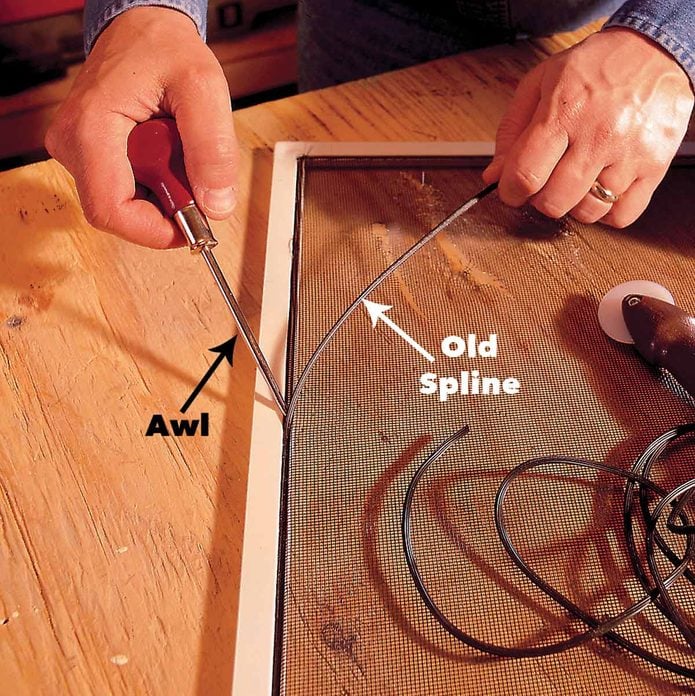 FAMILY HANDYMAN
Repair Any Torn Screens or Nets
Window screens, mosquito nets, and similar barriers protect against inquisitive summer and fall pests, but only if they provide complete protection. As long as the frame is in good shape, these easy repairs can be done in a few minutes. Here’s how to make your screen door or window look good as new.13 / 51 FAMILY HANDYMAN
Fix Your Own Furnace
If your furnace quits or breaks down try these eight simple furnace solutions before you call for service help. You can solve the problem and avoid a $200 service call.SPONSORED CONTENT
By TheWalletGuru — 2022 Best Gadgets14 / 51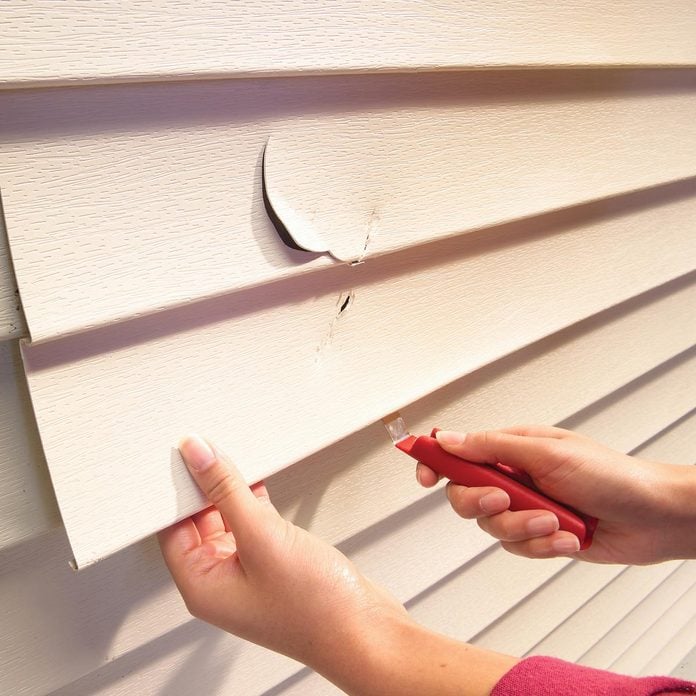 FAMILY HANDYMAN
Replace Damaged Vinyl Siding
Vinyl siding protects a home with a tough, water-resistant shell, but accidental damage can happen. If a falling branch or a well-hit baseball cracks a piece of your siding, you can make it as good as new in about 15 minutes with a $5 zip tool (available at any home center) and a replacement piece. It’s as simple as unzipping the damaged piece and snapping in a new one. Here’s how to replace your damaged siding.ADVERTISEMENTADVERTISEMENThttps://57cd6d63790a2a95f39d4c51bcc0115a.safeframe.googlesyndication.com/safeframe/1-0-40/html/container.html15 / 51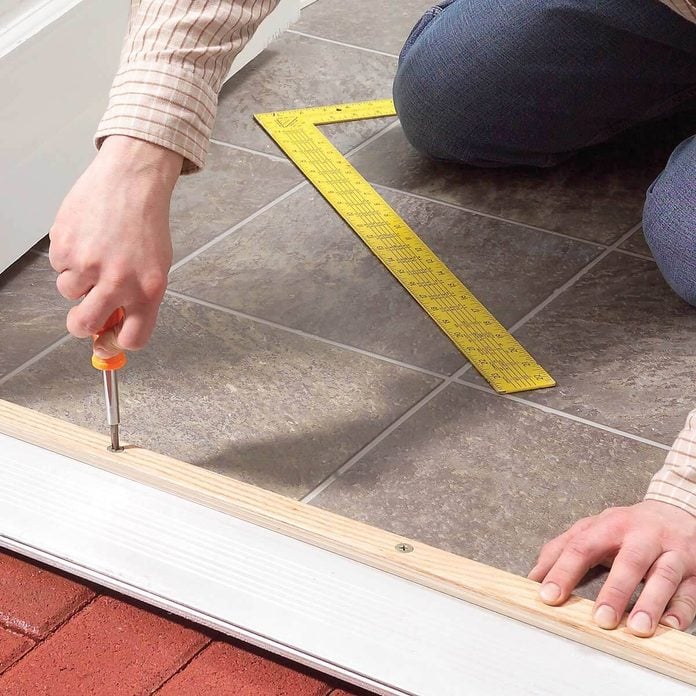 FAMILY HANDYMAN
Raise an Adjustable Entry Door Threshold
Those big screw heads in the threshold of a newer entry door aren’t just decorative; they raise or lower a narrow strip set in the threshold. So if you’ve noticed a draft under the door, try this: On a sunny day, turn off the lights and close nearby curtains. Lie down and look for daylight under the door. A sliver of light sneaking in at both corners of the door is normal. But if you see light between the threshold and the door, grab your screwdriver. Here’s how to raise the threshold.16 / 51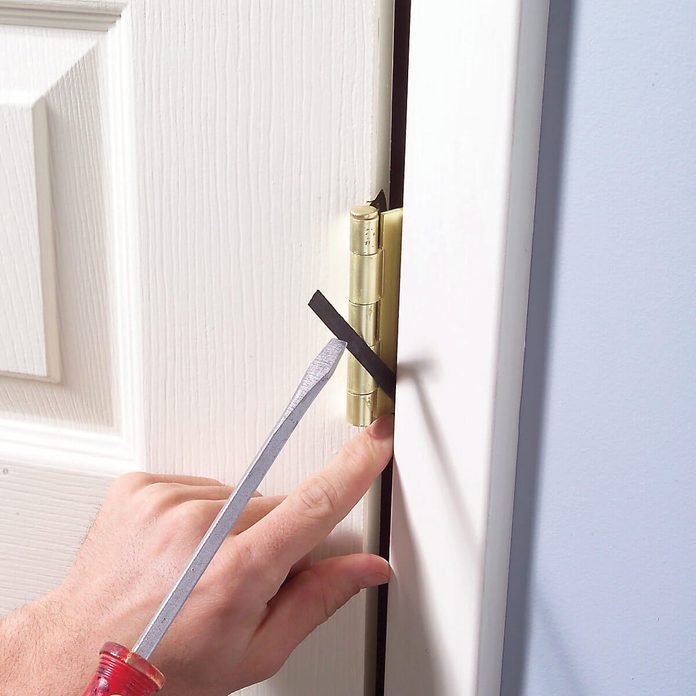 FAMILY HANDYMAN
Shim Gaping Doors
If you have big gaps along the latch side of your doors, they were probably prehung in their frames at the factory and installed as a unit. The installer should have adjusted the frame with shims to leave about a 1/8-in. gap along the latch side — about the thickness of two quarters (coins). Sometimes the gap is far too wide. Here’s how to shim gapping doors.17 / 51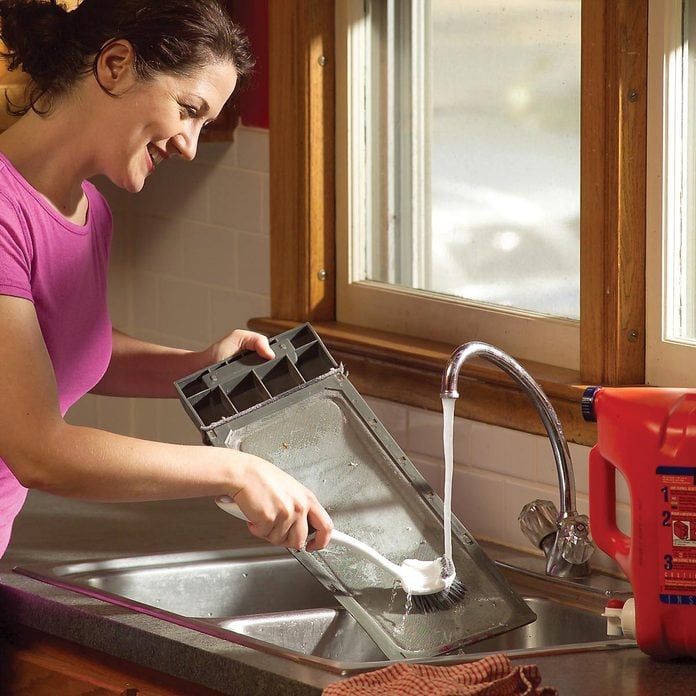 FAMILY HANDYMAN
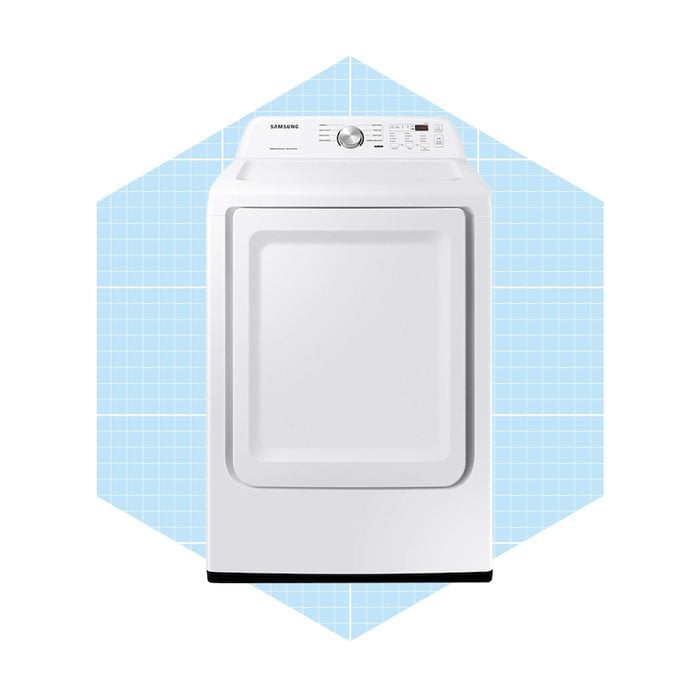
Wash the Dryer Filter
A poorly functioning clothes dryer often stems from a clogged lint filter. The filter may look clean, but a nearly invisible film caused by dryer sheets may actually block airflow. This film forces the thermostat to shut off the heat before your clothes are dry. Test your filter by pouring water into it. If the filter holds water, you should take time to clean it. Pull out the filter and scrub it in hot water with a little laundry detergent and a stiff kitchen brush.
Also, check the outside dryer vent for any lint that may have built up there.ADVERTISEMENTADVERTISEMENThttps://57cd6d63790a2a95f39d4c51bcc0115a.safeframe.googlesyndication.com/safeframe/1-0-40/html/container.html18 / 51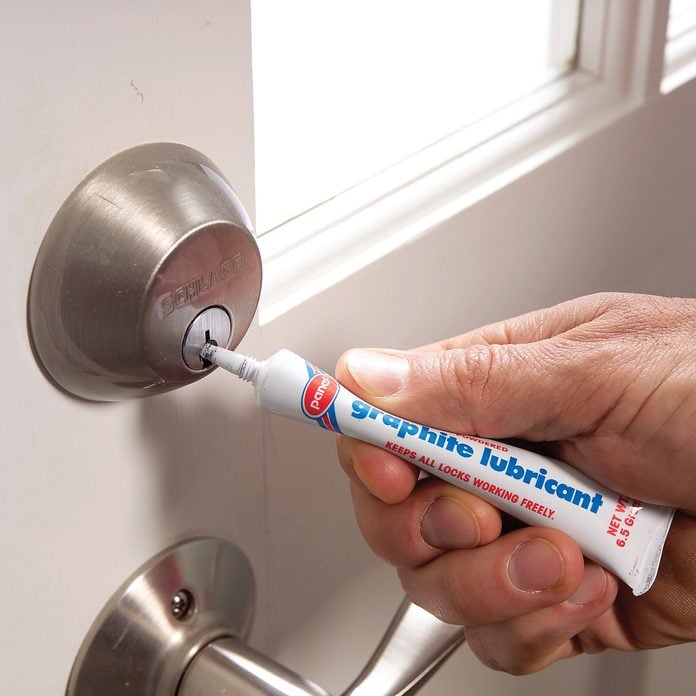 FAMILY HANDYMAN
Lubricate Sticking Locks
If your lock turns hard or your key doesn’t slide in smoothly, the lock might be worn out. Then again, it may just need lubrication. Squirt a puff of powdered graphite into the keyhole. Unlike liquid lubricants, graphite won’t create sticky grime inside the lock. A tube costs about $5 at home centers.19 / 51 FAMILY HANDYMAN
Organize Your Garage For Less Than $200
You can find lots of ways to create more storage space in your garage, but no other system is as simple, inexpensive or versatile as this one. It begins with a layer of plywood fastened over drywall or bare studs. Then you just screw on a variety of hooks, hangers, shelves and baskets to suit your needs. And because you can place hardware wherever you want (not only at the studs), you can arrange items close together to make the most of your wall space. As your needs change, you’ll appreciate the versatility of this storage wall too; just unscrew shelves or hooks to rearrange the whole system.SPONSORED CONTENT
By TheWalletGuru — 2022 Best Gadgets20 / 51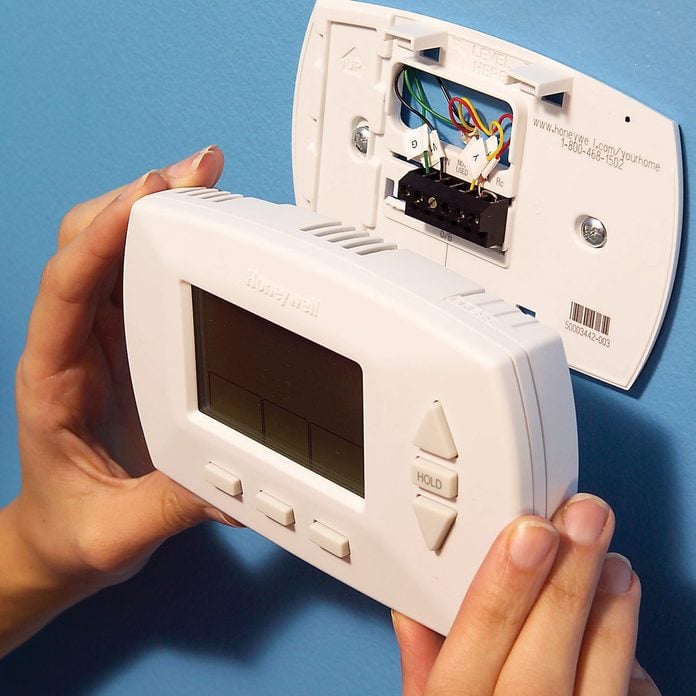 FAMILY HANDYMAN
Install a Programmable Thermostat
When it comes to energy savings, few upgrades pay off as quickly as a programmable thermostat. If you turn down the heat 5 degrees at night and 10 degrees during the day when no one is home, you’ll cut your energy bill by 5 to 20 percent. If you raise the temperature the same amount during the cooling season, your savings will be similar. You can do this with a manual thermostat, but a programmable model never forgets to turn down the heat at night and it can raise the temperature before you get out of bed in the morning. We show you how to install a programmable thermostat quickly and easily.ADVERTISEMENThttps://57cd6d63790a2a95f39d4c51bcc0115a.safeframe.googlesyndication.com/safeframe/1-0-40/html/container.htmlADVERTISEMENT21 / 51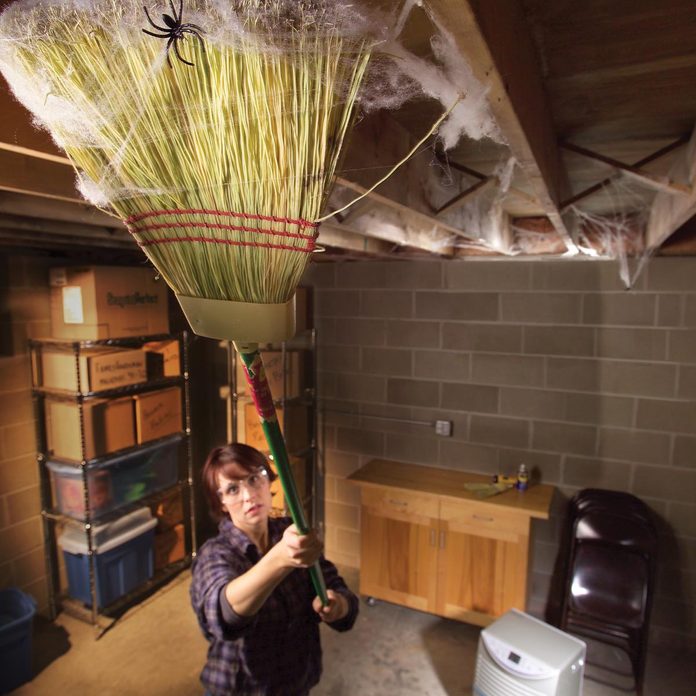 FAMILY HANDYMAN
Critter-Proof Your Home
If unwanted critters are waging war on your house, it’s time to fight back. We’ve gathered some effective pest-fighting strategies. Learn how to close the entryways that let critters in, and also how to evict them if they manage to get past your defenses.22 / 51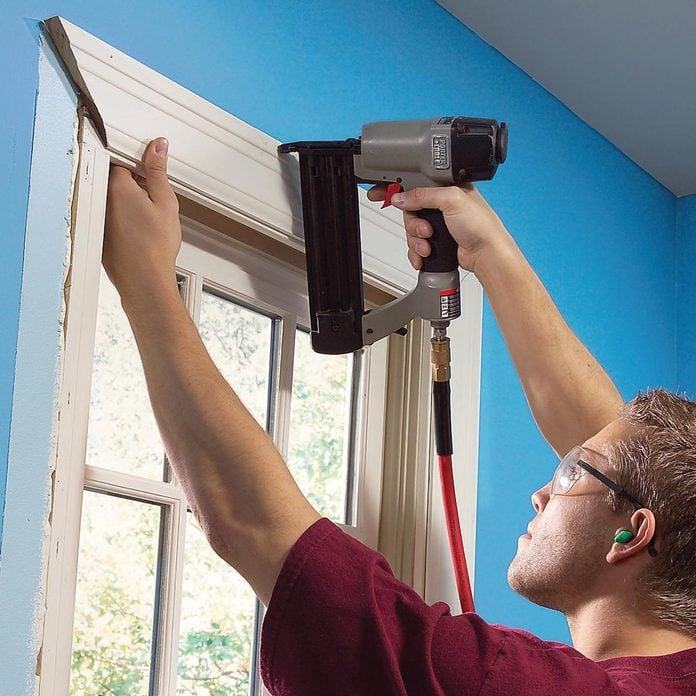 FAMILY HANDYMAN
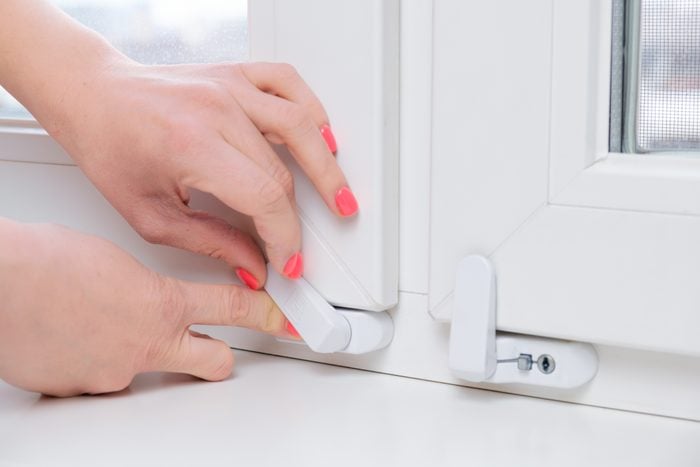
Stop Drafts Around Windows and Doors
If your windows or doors cause chilly drafts all winter long, the problem could be worn-out seals, weather stripping or thresholds. Then again, sloppy installation might also be to blame. When cold weather arrives, hold the back of your hand near the edges of windows or doors to track down the location of leaks. If you feel cold air flowing out from behind the trim, you can bet that the spaces around the window and door jambs weren’t properly sealed.
Plugging these leaks is a time-consuming job: You have to pull off the interior trim, seal around the jambs and then reinstall the trim. But if you have fairly airtight doors and windows, it offers a large payoff. Stopping drafts not only makes your home more comfortable but also cuts energy bills.23 / 51 FAMILY HANDYMAN
Insulate Rim Joists
In just a couple of hours, you can seal and insulate your rim joists, which cause major loss of heat in many homes. Insulating the rim joists is one of the best things you can do to make your home more energy efficient. This project lowers your heating costs and saves you money. And it’s easy, too, so anyone can do it. Learn how to insulate your rim joists here.ADVERTISEMENThttps://57cd6d63790a2a95f39d4c51bcc0115a.safeframe.googlesyndication.com/safeframe/1-0-40/html/container.htmlADVERTISEMENT24 / 51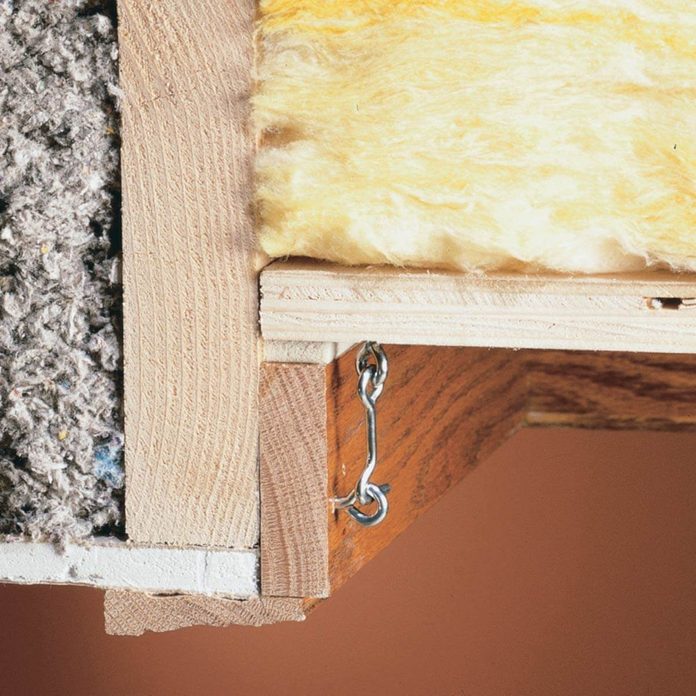 FAMILY HANDYMAN
Seal Attic Air Leaks
Small air leaks into uninsulated attic space create another major source of heat loss in many homes. With some inexpensive materials and a day’s labor, you can save lots of money on heating every year by sealing these holes.25 / 51 FAMILY HANDYMAN
Rake Those Leaves!
If you live in a snow-prone climate, getting your leaves up before the flakes fly is a good idea. You may think you know everything about this time-honored lawn care tradition but here are five ways to make this job a little easier for a fall-ready lawn.
By TheWalletGuru — 2022 Best Gadgets26 / 51 AIGARS REINHOLDS/SHUTTERSTOCK
Aerate the Lawn
To ensure lush grass and a healthy lawn in the spring, aerate in the fall. Aeration breaks up compacted soil to allow water and fertilizer to penetrate deep down into a healthy root system. A must-do, fall-ready project. For more, check out our fall lawn care guide.ADVERTISEMENTADVERTISEMENT27 / 51 VIA BALL SEED
Prep Your Garden
Prep your fall-ready garden now for less work in the spring. Remove any past-their-prime annuals and rake out any rotting leaves. To protect your garden pots from breakage due to freezing water, empty, clean and bring indoors for the winter. After that’s done, check out these 10 easy-to-build planters you can make over the winter and start planning your spring container garden!28 / 51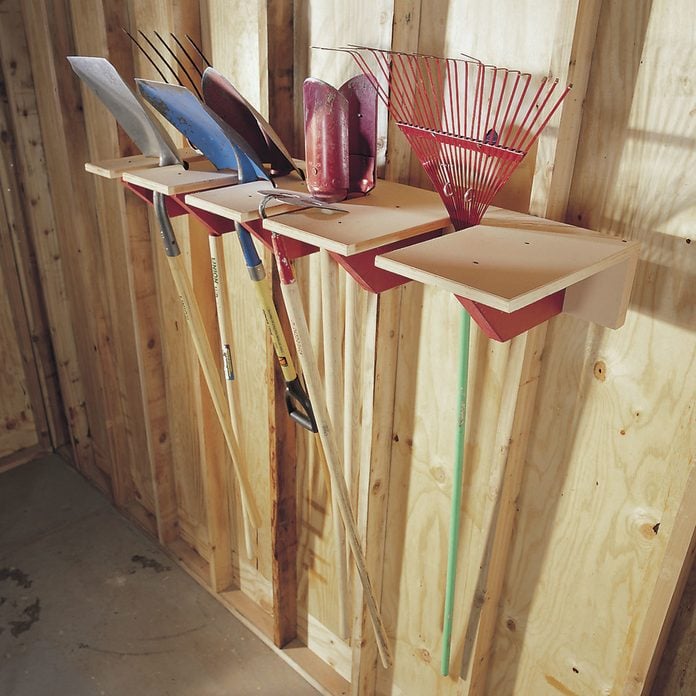 FAMILY HANDYMAN
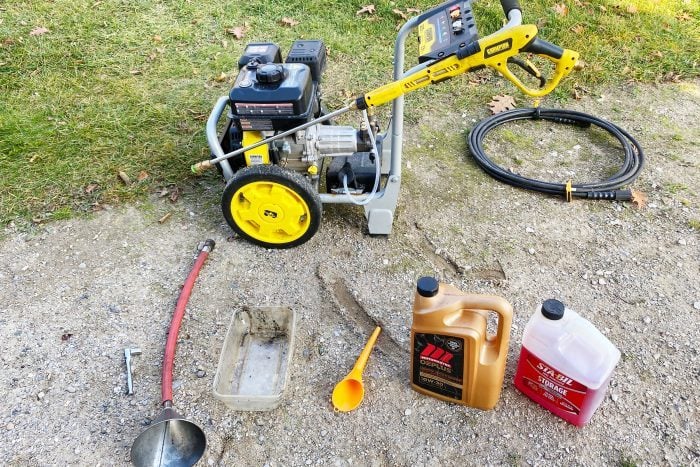
Clean and Store Garden Tools
Act now to protect your garden tools from rust, wear and tear. Give your tools a good cleaning, sharpen blades as necessary and dry thoroughly before you store them. After all of this prep, they will be fall-ready.29 / 51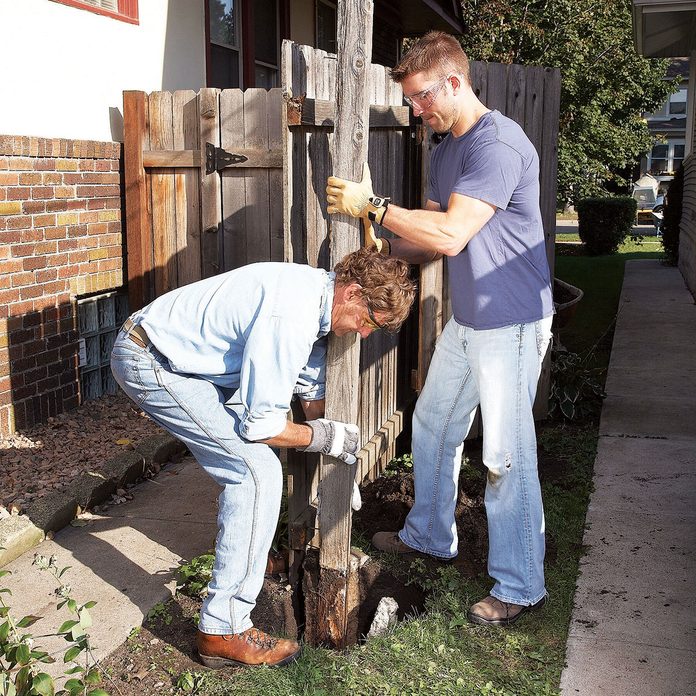 FAMILY HANDYMAN
Inspect Your Fence
Fall provides an ideal time to inspect fences and take care of any rot or structural issues before they become problematic. Ground frost can cause weakened fence posts to heave and shift over the winter. This results in damage all along the fence line. For the skinny on how to take care of any fence maintenance and make it fall ready, check out our guide here.ADVERTISEMENTADVERTISEMENThttps://57cd6d63790a2a95f39d4c51bcc0115a.safeframe.googlesyndication.com/safeframe/1-0-40/html/container.html30 / 51 FAMILY HANDYMAN
Drain Ponds
Falling leaves and debris can do more than clog pumps and filters. They can encourage algae growth in your otherwise pristine pond. Get your pond fall ready by draining and cleaning your ponds and waterfalls to prevent damage. Plus, here’s how to build a backyard pond and fountain in one weekend
Visit FamilyHandyman.com for more articles like this. Reprinted from FamilyHandyman.com, © 2022 Home service Publications Inc. , Gerhardt, Nock 08/23/2022


 MORE FROM FAMILY HANDYMAN


