The foyer is the first room inside the house that people see as they enter. So, make a statement. Hillary Stamm with HMS Interiors and Jessica Nicastro with Jessica Nicastro Design. Show off how to make a great first impression that welcomes guests with a few unique touches in the foyer.
Hillary Stamm is the owner of HMS Interiors, a full-service design firm based in Manhattan Beach, Calif. View some of Stamm’s recently designed foyers below.
Vintage Vibes
This foyer was designed all vintage, with the rug and the client’s mother’s vintage mirror, paired with books and baskets to create a styled but welcoming feel.
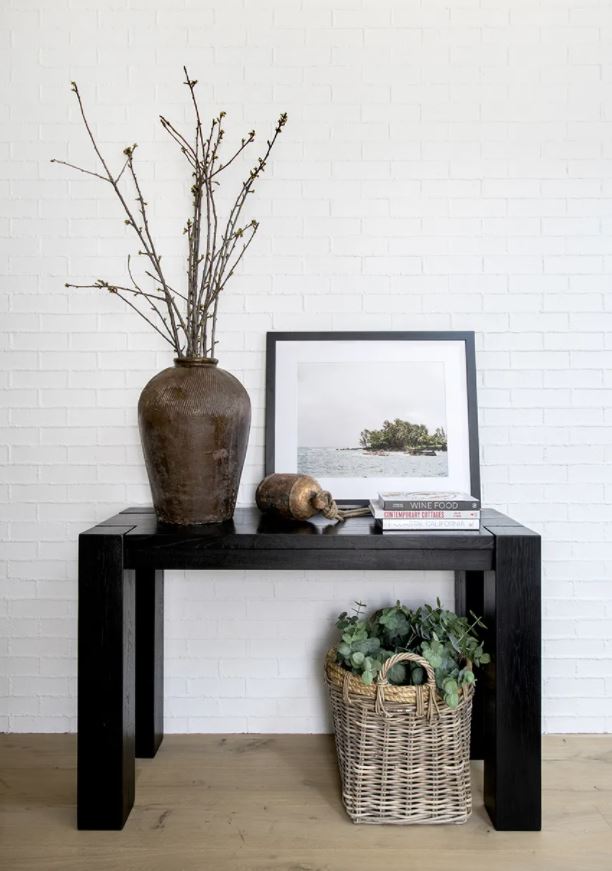
Spotlighting the Staircase
This dramatic staircase is paired with a table holding an eclectic assortment of stylish goods, a floral arrangement, and art.
Simple But Styled
Stamm uses a couple brass antiques mixed with baskets and art to mix up the foyer and add in some character.
Jessica Nicastro is the owner of the design firm Jessica Nicastro Designs based in Encino, Calif. Nicastro shares some of her recently designed foyers below.
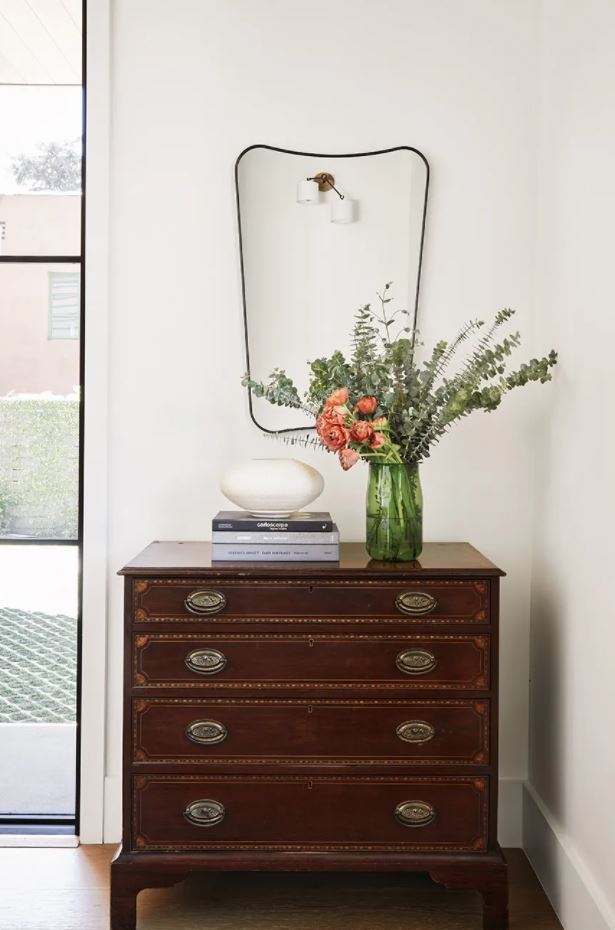
Antiqued
Nicastro pairs an antique dresser with an abstract mirror, tall florals, and a whimsical pottery piece to add some polish to the foyer.
A Color Pop
The very white space pops with the dark blue cabinet, fun gold accents, and a few books that could even spark a discussion.
Stair Accents
Nicastro gives the foyer character without taking up any space by adding fanciful tiles onto the stairs.
Copyright National Association of REALTORS®. Reprinted with permission.
That dark time when winter just won’t go is like that friend who can’t take a hint to leave.
Give a push with these four easy tasks that’ll help usher in spring.
#1 Deep-Clean Your Entryway Snow. Salt. Boots. Shovels. Your entryway floors, baseboards, rugs, and more have had a rough few months. Give that smallest of rooms some deep cleaning love now, before the salt crust becomes a permanent part of your entryway decor in spring.
#2 Make an Anti-Mud Plan Mud may be the least of your frozen worries now, but it’s a-coming.
Be prepared with a remediation plan. With your yard in its frozen-tundra state, you can easily see the troublesome spots.
Research potential ground cover, like gravel, a rain garden, decorative rocks, or the right grass that’ll soak it up. Then you’ll be ready to execute your anti-mud plan the moment it’s warm enough — and do it in time to keep the mud at bay.
#3 Organize Your Cleaning Closets and Laundry Room Before the madness of spring cleaning begins, organize (or even renovate!) your laundry room and clean closets or cupboards.
This will not only breathe new life into these often-ignored areas, but perfectly pampered cleaning stations can seriously rev up your spring cleaning motivation.
#4 Hail a Handyperson Spring and summer are peak handyperson seasons. Skip the surge pricing and the agony of waiting for callbacks by hiring someone now. At least for the indoor chores.
Plus, you may be surprised at what outdoor chores can be done.
You’ll be spring-ready before the first flower buds.
“Visit HouseLogic.com for more articles like this. Reprinted from HouseLogic.com with permission of the NATIONAL ASSOCIATION OF REALTORS®.”
Spending time outdoors at the height of the pandemic was a way to get fresh air, exercise safely, and expand living quarters. Now, nearing two years later, an outdoor retreat has become even more sought after, causing homeowners and design professionals to get creative in maximizing square footage.
Whether homeowners have a big suburban yard, rural acreage, or a small urban balcony, there are multiple ways to take advantage of the space, even in winter. They can pile on layers or follow the Swedish mantra of Friluftsliv, which translates to “open-air living and the value of spending time in remote locations for spiritual and physical well-being.”
The key isn’t the size of their space, or which activities homeowners do, but taking advantage of Mother Nature’s gifts—air, sky, clouds, sun, and greenery.
Millennials and other new homeowners have become particularly adept at using their yards for almost everything—from camping out with a tent and fire pit to organizing a staycation, or setting up an alternative office when they need a break from their indoor space, says Kris Kiser, president and CEO of TurfMutt Foundation, the education arm of the Alexandria, Va.-based Outdoor Power Equipment Institute, which encourage enjoyment of nature.
Kiser says there’s even a new term for this trend, which doesn’t need translation: Backyarding!
Here are eight ideas to share with clients to help them make the right investments in furnishings, landscaping, appliances, and more for their yards.
1. Link the indoors and outdoors by blurring lines. The most common way to do this is to add more windows and doors to connect the spaces and make the glazing bigger to achieve better views. It can also be done by using more colors and textures found in nature inside the home and bringing in plants. Homeowners can also decorate outdoors as they do inside, according to the online design resource, Houzz. The company’s search data shows that people want their backyards to be relaxing extensions of their interiors, which can be handled with stylish, durable materials, as well as by adding a fireplace or fire pit, outdoor TV, sound system, and comfortable seating, pillows, and rugs.
2. Set up an outdoor office. Many people made do with cramped makeshift offices during the pandemic. Others created separate indoor spaces but working outdoors can literally offer a breath of fresh air to ramp up creativity. Flowers, bushes, and trees can become the living backdrop on conference calls instead of the kitchen counters or office bookcases. Essentials to make it work include strong Wi-Fi, an electrical outlet or two for equipment that’s not wireless, a sturdy table for a laptop, a comfortable chair, lighting for night-time work, and a rug to add warmth underfoot. Some may want a small portable generator to keep power running, Kiser says.
3. Dine al fresco. Homeowners shouldn’t limit themselves to only eating dinner outdoors. Any meal—breakfast, brunch, lunch, cocktails, and snacks—can be enjoyed plein air. They should have a nice flat area, whether a balcony, terrace, or deck, to set up a table and chairs with enough space to navigate around them. Homeowners also should choose a material that won’t need frequent repainting—many closely resemble real wood and stone and are sustainable. Add the right equipment—a grill, pizza oven, running water from a spigot that won’t freeze (or a sink), and firepit—to make the experience more enjoyable. They can hang some lights, maybe a curtain, and if there’s room and funds, construct a pergola for an overhead cover. If the homeowners like the sound of running water, they can add a recirculating fountain so the water won’t freeze in the winter.
4. Add entertainment. All work and no play isn’t fun, and the outdoors is a perfect place for classic games like croquet and badminton, and board games such as Monopoly and Clue, or jigsaw puzzles. Many families are also investing in large-screen outdoor TVs and movie projectors. And then there are all the pools being built. If there is no room or funds, they might consider a less costly above-ground pool or smaller hot tub. Suggest they position it close enough to the house so they’re not trekking far in the cold or snow.
5. Establish a wildlife habitat. Attract pollinators such as bees, butterflies, and birds by planting the right flowers and plants. Add a greenhouse if there’s room, which will allow homeowners to garden all year. A birdhouse and feeder or two, and great additions; even a chicken coop is becoming more commonplace.
6. Make a yard pet friendly. Are your clients’ pet owners? If they have a dog, they could add a fence of some type, maybe a sandpile for digging, a doghouse that’s large enough so Fido doesn’t feel cramped, and perhaps an agility course so he or she gets good exercise. Hardscape like bricks, concrete pavers, or stone can be an alternative spot to urinate that won’t ruin your lawn. Also, homeowners can consider some faux lawn choices—many look authentic—and avoid planting things that are toxic to dogs and people, according to The Spruce.
7. Store neatly. Even outdoor spaces can become cluttered. A shed or closet in a garage can be set up with shelves, bins, and hooks to hang rakes, bicycles, helmets, and more. This will also keep tools out of reach of young children, and provide a place to store fuel safely, too, says Kiser.
8. Create some privacy. While homeowners may want to have a friendly relationship with their neighbors, they may also want some privacy at times, especially when working from home or throwing parties. Fences work well, but so can living screens of greenery—rows of trees, bushes, or vines. They should choose native materials that don’t require a lot of watering and consider materials that provide color or texture year-round. Suggest they start small with plantings that will grow over time, which is less costly than investing in big, mature plants.
While many of the tips on this list can be undertaken by a skilled DIYer, homeowners should also consider contacting a contractor, landscape designer, or architect sooner rather than later since many are booked far in advance.
“Copyright National Association of REALTORS®. Reprinted with permission.”
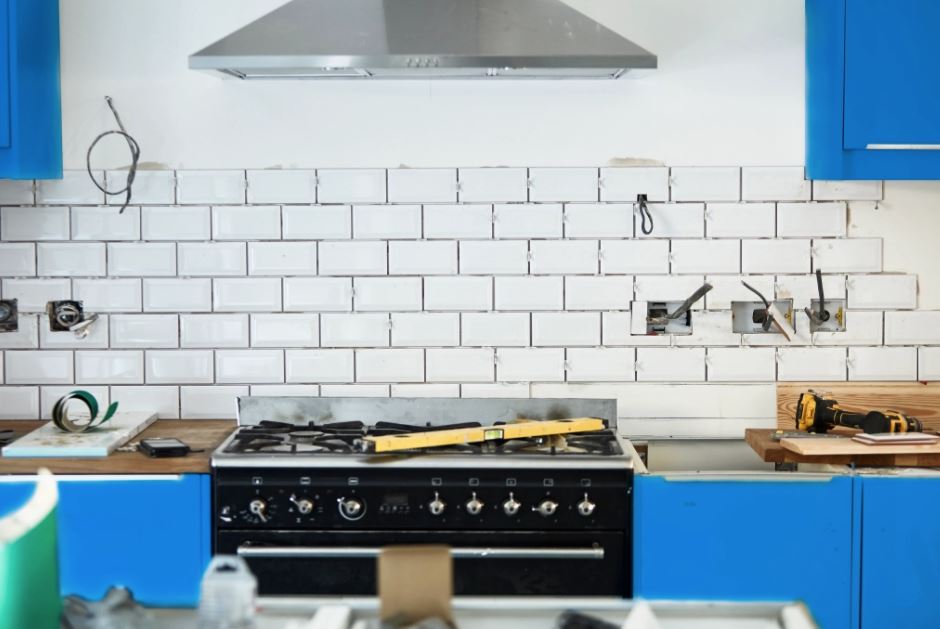
How much is that kitchen remodel going to cost you? That’s a hard number to nail down. It’s not like you can cost compare on Amazon.
Instead, you need to research, create a budget, and track your expenses. Having your own kitchen remodel worksheet can help. Download it here. (You’ll be prompted to make a copy of the interactive worksheet — just for you).
Or, scroll on to see what kind of costs to expect and how to save on a kitchen remodel to get the most return on your investment.
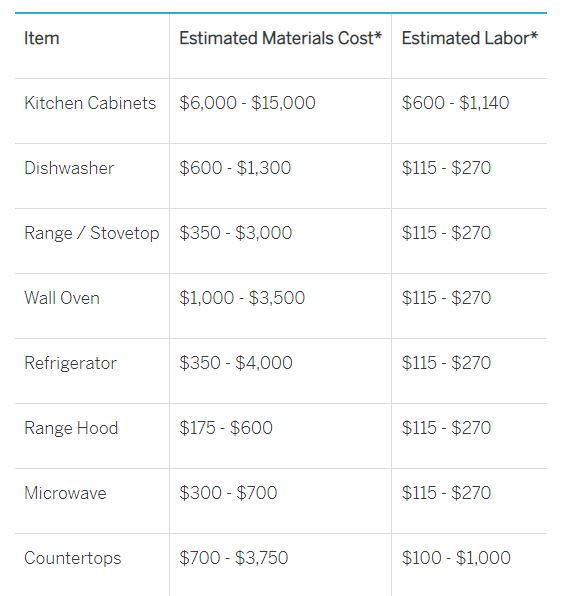
Costs of a Typical Kitchen Remodel Below are itemized costs of kitchen materials and labor so you can see where the possibilities for savings exist.
Price ranges on materials include builder-grade, mid-grade, and better quality, but not the most expensive you can buy. These numbers are meant to convey typical costs.
“Visit HouseLogic.com for more articles like this. Reprinted from HouseLogic.com with permission of the NATIONAL ASSOCIATION OF REALTORS®.”
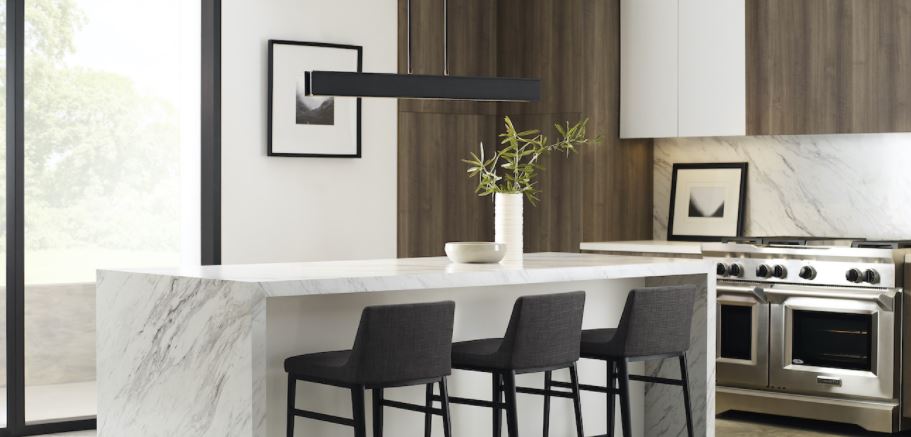
The kitchen became an even more significant heart of the home during the pandemic as the focal point for gathering, working, entertaining, and, of course, cooking, says Joe Fava, CEO of Fava Design Group in Miami. Now, homeowners are putting more into their kitchen space—literally. They’re buying larger refrigerators, freezers, and sinks, and second dishwashers and ovens, he says.
Homeowners are entertaining and cooking even more at home, and the price tag reflects their exuberance. Those who can afford to do so spend upwards of $100,000 on kitchen upgrades. But your clients don’t have to pay that much to get a kitchen they love. Much smaller, less costly improvements can make any kitchen more appealing. Here’s how.
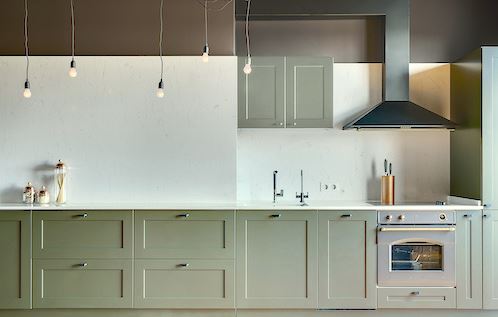
Think color. Kitchen colors are changing. Although white cabinets remain the most popular choice, according to the Houzz design site, the trend is moving toward additional color and warmth to give the room more personalized, says designer Kristie Barnett of The Decorologist in Nashville. Medium green cabinetry is becoming popular, as well as dramatic quartzite countertops and backsplashes. Some reflect hues as vivid as purple, says Fava.
The use of green is part of a bigger trend dubbed “forest bathing,” which means being surrounded by natural materials and spending time among nature to calm oneself, which the Japanese call shinrin-voku. If you can’t walk in a forest, some say bringing the colors in can help destress. The nature-inspired shades and textures are turning up in unexpected places like cabinetry, appliances, and hoods, says J.T. Norman with Kitchen Magic in Nazareth, Pa. For example, Fulgor Milano’s “Sofia” professional range door color kits offer six matte and glossy hues.
Think wood. In addition to color, wood veneers are also in vogue as part of the forest bathing trend, says Fava. “Clients come to us with an interest in a warmer aesthetic of a wood veneer in anigre, an exotic wood, or sometimes a lighter wood color.”
The younger generation is more interested in sustainable materials and designs than older clientele, he says. Because of the wood veneers, some cabinets no longer require hardware and depend on a touch latch to open and a button to close. But for those cabinets that use hardware, they’re showing up in a variety of metals: gold, champagne, matte black, and rubbed oil bronze. Norman is seeing more greiges or warm brown and taupe tones returning as part of this outdoor vibe.
Light in layers. With advancements in LED technology, new lighting options continue to roll out, according to kitchen designer Mick De Giulio of de Giulio Kitchen Design in Chicago. “You can now incorporate small, beautiful lights in colors that range from 2700 to 3000 Kelvin—warm to cool—and layer different effects throughout any room,” he says.
In a kitchen, De Giulio likes to use lighting to outline a room’s features—floor toe kicks, cabinets, backsplashes. For more decorative purposes, he may add wall sconces or a linear fixture above a kitchen island. Recessed cans have gone out of style because they make a ceiling look cluttered.
Consider simpler but varied cabinets. Cabinetry is going in a few different directions. Some are taking cues from European-inspired design. Elmwood recently introduced a collection called “Renaissance” that offers a choice of metallic paint hues in gold, silver, copper, all inspired by the continent’s great palaces. Simpler, more modern is also in, which means less maintenance is needed, says Norman.
Architect Eddie Maestri of Maestri Studio agrees and sees fewer Shaker boxes and more taupe-gray color of the wood and other colors if the kitchen is traditional. In his own kitchen, he used brass for upper cabinet doors and black walnut for lower ones.
Cook healthier and smarter. Some homeowners consider a steam oven today’s “it” appliance choice because allows for healthy cooking. Fulgor Milano’s 30-inch model allows optimal vitamin retention and flavor and works as a steam, convection, and combi-steam cooking unit. Smart appliances that can be paired with a smartphone via download apps are also desirable among homeowners. Smart refrigerators, for example, alert homeowners when they’re low on items so groceries can be ordered. Smart ovens can be turned on via an app to preheat even when homeowners aren’t home, says Norman.
Try larger flooring tiles. Fava is using more large-format porcelain tiles in the kitchen today—as big as 30 by 60 inches instead of plank styles, which, he says, “have seen their day.” Norman also likes larger tiles but in luxury vinyl that better mimics wood. Maestri steers clear of hardwoods and prefers “statement” tile in concrete, depending on the house, he says.
Go seamless with the backsplash and countertop. The same material is being used for both areas to offer a less choppy, seamless look, says Norman. He favors quartz. Maestri likes this approach, too, or using two similar designs in quartzite, marble, or certain granites.
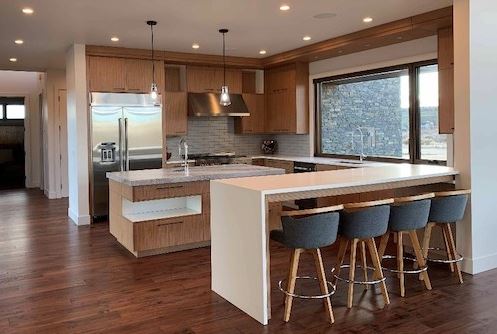
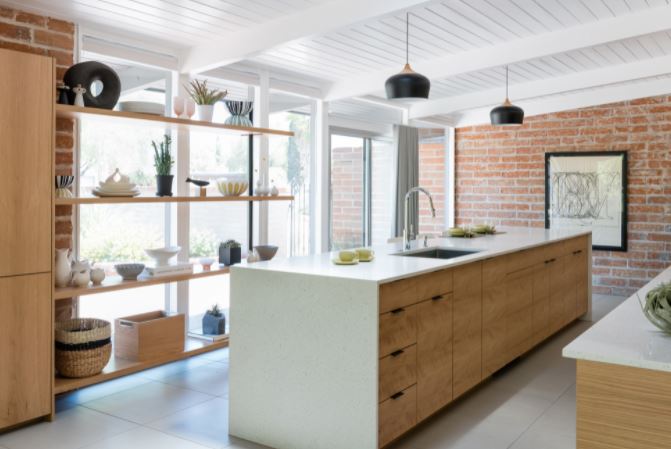
Double the island. One island is considered great, but now two are twice as good (if there’s room).
“It’s a twin to the existing island,” says Norman, whose clients are willing to take down a wall to make it feasible. Instead of using the same island, Maestri might include a design that resembles furniture, which can also function as a barrier between a less open kitchen and adjoining living space.
Copyright National Association of REALTORS®. Reprinted with permission.
Your home is in the perfect location, came at the perfect price, with the perfect lot. (Yay southern exposure!)
But the home itself? Perfect isn’t the adjective you’d use. But you knew that moving in, and now you’re ready to start making it just right.
Where to begin, though? How about with data? Data is that friend who tells you like it really is.
Because while any home improvement that brings you joy is priceless, not all add as much home equity as you might expect.
The “Remodeling Impact Report” from the National Association of REALTORS® has tons of data on how much improvements cost — and how much of those costs you can recoup.
Here are eight of the report’s best home remodeling projects with equity-building might:
#1 New Roof
If you find yourself sprinting for the buckets when it starts to sprinkle, getting a new roof should be your No. 1 to-do. Measuring rainfall from the indoors isn’t cool.
The cost: $7,500
The return: 107% at $8,000
Considering it’s what’s between you and the elements, it’s a no-brainer.
Not sure if you need a new roof? Signs you might include:
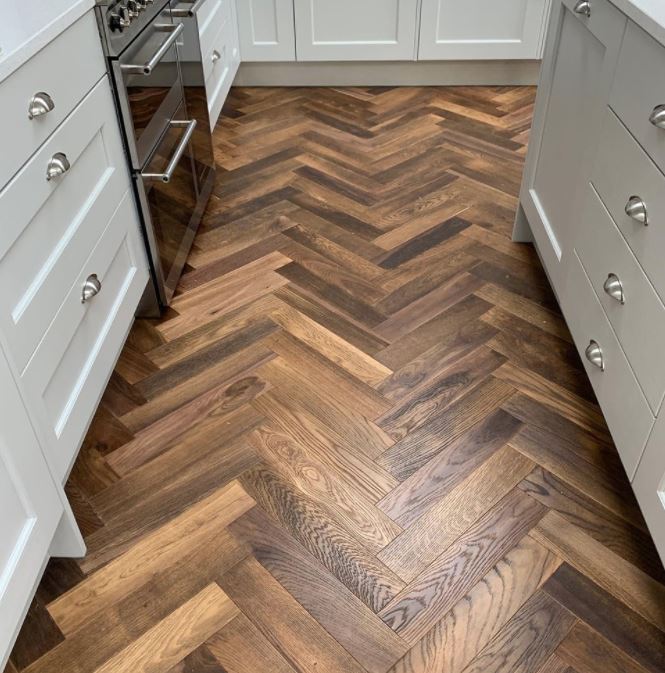
Shingles are missing, curling up, or covered in moss. Gritty bits from the asphalt shingles are coming out the downspout. The sun’s shining through your attic. You notice stains on ceilings and walls. Your energy bill is sky high. #2 and #3 Refinished or New Hardwood Floors
Flip on the TV to see that your fave home reno-ing duo is it at again, flipping a ranch that’s stuck in the ’80s.
They make it to the living room, pull back the dingy carpet to reveal hardwood floors in great condition. They’re psyched — and for good reason.
Hardwood floors are a timeless classic. Refinishing is a no-brainer. Neither will you regret adding new hardwood floors if you have none.
The cost to refinish: $2,600
The return: 100% at $2,600
The cost to buy new: $4,700
The return: 106% at $5,000
#4 New Garage Door
No surprise that a garage door replacement project made it onto this #winning list — a new garage door provides a big boost for your home’s curb appeal at a relatively modest cost.
The cost: $2,100
The return: 95% at $2,000
There are options galore, too. A host of factory-finish colors, wood-look embossed steel, and glass window insets are just some of the possibilities that’ll give your doors bankable personality.
#5 Better Insulation
Insulation is tucked out of sight, so it’s often out of mind — that is, until you’re forced to wear your parka indoors because it’s sooo darn cold.
The cost: $2,400
The return: 83% at $2,000 (plus the added savings on heating and cooling costs!)
#6 New Siding
In any color! And never paint again.
Those are two of the three benefits of vinyl siding. The third, of course, is your home’s value.
But if long-time homeowners look at you funny when you mention vinyl siding, just tell them that today’s vinyl is way better than what they remember because of fade-resistant finishes and transferable lifetime warranties.
The cost: $15,800
The return: 63% at $10,000
#7 Fiber-Cement Siding
Want fiber-cement siding instead? It also shows a strong payback of 76%. Although it’s the pricier option — you’ll spend about $19,700 with a payback of about $15,000 — it has one thing vinyl still lacks — the perception of quality.
The cost: $19,700
The return: 76% at $15,000
#8 HVAC Replacement
Air quality is top of mind these days, so replacing an HVAC system is a timely project — plus it cuts those pesky utility costs. Of the people surveyed in the NAR report, almost half said the most important benefit of HVAC replacement was better functionality and livability.
The cost: $8,200
The return: 85% at $7,000
Quality matters. In a survey from the National Association of Home Builders, “quality” was the one of the most important traits home buyers focused on when house hunting.
Perceptions of quality can vary, but the majority of both first-time buyers and repeat buyers said they’d rather have a smaller home with high-quality products and services than a bigger home with fewer amenities.
Visit HouseLogic.com for more articles like this. Reprinted from HouseLogic.com with permission of the NATIONAL ASSOCIATION OF REALTORS®.
Fall and winter start cozy — who hasn’t used the colder temperatures as an excuse to binge-watch Netflix while swaddled in a couch blanket?
But come January, staying indoors can feel less like a treat and more like you’re living in a cave.
Here’s how to make your house lighter, brighter, and cheerier with more natural light indoors.
#1 Take the Screens Off Your Windows
You’ll get 30% more sunlight shining indoors without screens on your windows.
Here’s the best part: Sunlight warms your room and saves you money on your heating bill. It’s solar power — for you!
Be sure to store your screens in your garage or basement, where they won’t get damaged. In the spring you’ll want to put them back on so you can keep that 30% of the sun out and run your cooling system less.
#2 Hang Outdoor String Lights Indoors
They don’t give off a lot of light, but they’re cheerful as heck.
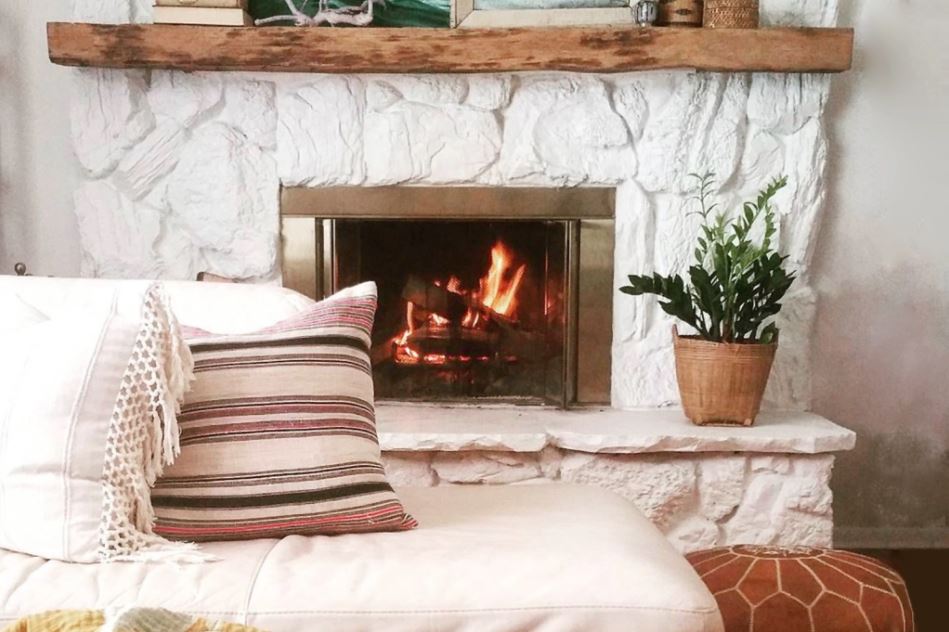
Drape them around a window or a mantel, or hang a string of LED glimmer lights in a tall potted plant. They’ll add a layer of soft light to your room and remind you of fireflies, flip-flops, and patio parties.
#3 Steal a Little Swedish Chic
Scandinavians excel at making a home light and airy because they’ve got places where the sun doesn’t rise at all from November to January.
And you thought you had it bad.
To adapt to weeks and weeks of polar night, Swedes keep interiors pale to reflect and amplify light.
Think white walls, light woods for furniture and floors, and light upholstery. To get the look without getting rid of your dark furniture and floors, put white or light gray slipcovers on your sofa and chairs, and put down light-colored rugs.
The fastest way to bring a little Sweden into your room is to paint it. Try creamy white, pale blue, or dove gray.
#4 Change Your Bulbs
Replace those incandescent bulbs and their yellowy light with LEDs, which produce a brighter, whiter light.
But get your bright right:
The higher the K rating on the bulb, the cooler and whiter its light. For cool, white light, opt for a bulb rated 3,500K to 4,100K. For blue-white light that’s closest to natural daylight, use a bulb between 5,000K and 6,500K. Unless you live in Sweden (see above) you may want to leave the uber-high K bulbs for grow rooms and seasonal affective disorder therapy clinics — because they’re as bright as real sunlight on a hot summer day at noon. You’ll need sunglasses to read.
#5 Hang Mirrors
Make the most of that weak winter light by bouncing it around the room with mirrors.
If you don’t want the distraction of seeing your reflection all the time, use a large, convex one — also known as a fish-eye mirror. It will amplify light better than a flat one. Another option: Hang a gallery wall of small mirrors.
#6 Replace Heavy Curtains With Blinds or Roman Shades
Fabric curtains, while quite insulating, block light and make a room feel smaller and more cramped, especially if they’re a dark color or have a large print.
Try Roman shades or a simple valance paired with blinds to let in the maximum amount of natural light.
#7 Clean Your Windows
Dirty windows block a lot of natural light.
Admit it. Yours are kind of cruddy because who remembers to block out an afternoon to clean the windows?
So, get it on your list. Clean the glass inside at least once a month and the glass outside once a year. Your serotonin level will thank you.
#8 Swap Your Solid Front Door for One With Glass Inserts
A solid front door can make your house look and feel as dark as a dungeon.
Get rid of it and install a half-light or full-light door that lets the natural light stream in. For even more natural light, add glass sidelights and a glass transom.
A new entry security front door will cost about $250 in fiberglass and $975 in steel, including parts and installation. A a new door will add curb appeal, which equals higher resale value. And coming home in the evening to the warm glow of light radiating out the glass panels in your front door is an instant mood lifter.
#9 Add a Skylight
It’s the ultimate way to bring more natural light into your house. A window only catches sun for a couple of hours a day, but a skylight lets in the sun all day.
An indoor view of the sky makes deepest January more tolerable. And feeling the warmth of the sun on your skin, light streaming from above, is liberating. A skylight, installed, costs between $1,300 and $3,000. A cheaper alternative is a tubular skylight, which costs $500 to $950 including installation.
If you’re really good with tools, you can install a tubular skylight yourself. Don’t even think about installing a full-blown skylight yourself.
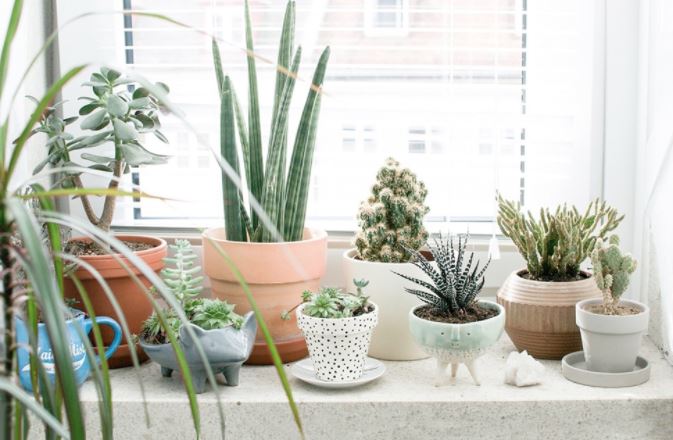
#10 Add Plants
Putting pots of plants around your room will remind you that spring and green will return.
Match plants to the amount of light you have, because dead and dying plants are depressing. Tropicals that thrive in indirect light are usually the best choice. If you have a sunny window you’ve got more plant options.
Bonus points for adding a plant that blooms in the winter, like a kaffir lily or anthurium.
Visit HouseLogic.com for more articles like this. Reprinted from HouseLogic.com with permission of the NATIONAL ASSOCIATION OF REALTORS®.
If you’re a homeowner in a snowy climate, chances are good you rue the winter: All that snow has to go somewhere, and it’s not getting there itself.
Cue the snow shovel.
Barring a move to a snow-free state or barricading your family inside all winter, there’s no way to avoid the endless task of shoveling snow. There are, however, ways to make the process much easier. Here are three simple hacks to make the morning after a snowfall much less stressful.
#1 Spray Your Shovel with Cooking Oil Snow sticking to your shovel makes an already arduous task even more obnoxious. Avoid it with this hack: Lightly coat your shovel with non-stick cooking oil to make snow slide right off. No more time wasted removing snow from your snow remover. (You can substitute a spray lubricant like WD-40, but the downside is it’s toxic.)
#2 Lay Out a Tarp Before the Snow If you like short cuts, this technique, billed as “the laziest way imaginable” to clear snow, according to a tutorial from “Instructables,” has got your name on it. The day before an expected snowfall, lay a tarp on your walkway. When the snow finishes falling, just pull out the tarp, and voilà: an instantly cleared walkway. (Word to the wise: Make sure pedestrians won’t trip on your tarp; include a sign or use this technique in your backyard walkway if you’re concerned.)
The technique requires a tarp, firewood, and twine as well as some prep work. Pre-storm, use firewood to weigh down your tarp — you don’t want it flying away in the wind! — and tie the twine to both the tarp and to a shovel standing upright in your yard. You’ll use the shovel to pull out the snow-laden tarp.
Although this method might be faster than shoveling, it does require manpower. After all, a cubic foot of snow can weigh between 7 and 20 pounds. So don’t get too ambitious with the size of your tarp or you might not be able to pull it once it’s full of snow.
#3 Make a Homemade De-icing Cocktail De-icers make snow removal easier by cutting through the tough, icy layers that are a pain to remove with a shovel. But an easy solution should be easy on your property as well. Many commercial de-icers are pretty harsh.
Commercial ice-melting substances — magnesium chloride, calcium chloride, potassium chloride, and sodium chloride (salt) — all cause damage to the environment, according to the University of Maryland’s Home and Garden Information Center. They can also damage concrete sidewalks and driveways, which mean hefty repair costs later.
A better solution: Make your own de-icer using rubbing alcohol or vinegar. You’ll save money, too. Commercial melters typically cost $8 or more. Plus, you’ll avoid the hassle of trekking to the hardware store to stock up.
Use vinegar before a storm to make ice and snow removal easier:
Combine 3 parts vinegar to 1 part water. Spray or pour gently (you still want to avoid runoff into your landscape) before a storm. To keep the sidewalks and steps from icing after a storm:
Combine 2 parts rubbing alcohol with 1 part water. Apply to minimize runoff.
“Visit HouseLogic.com for more articles like this. Reprinted from HouseLogic.com with permission of the NATIONAL ASSOCIATION OF REALTORS®.”
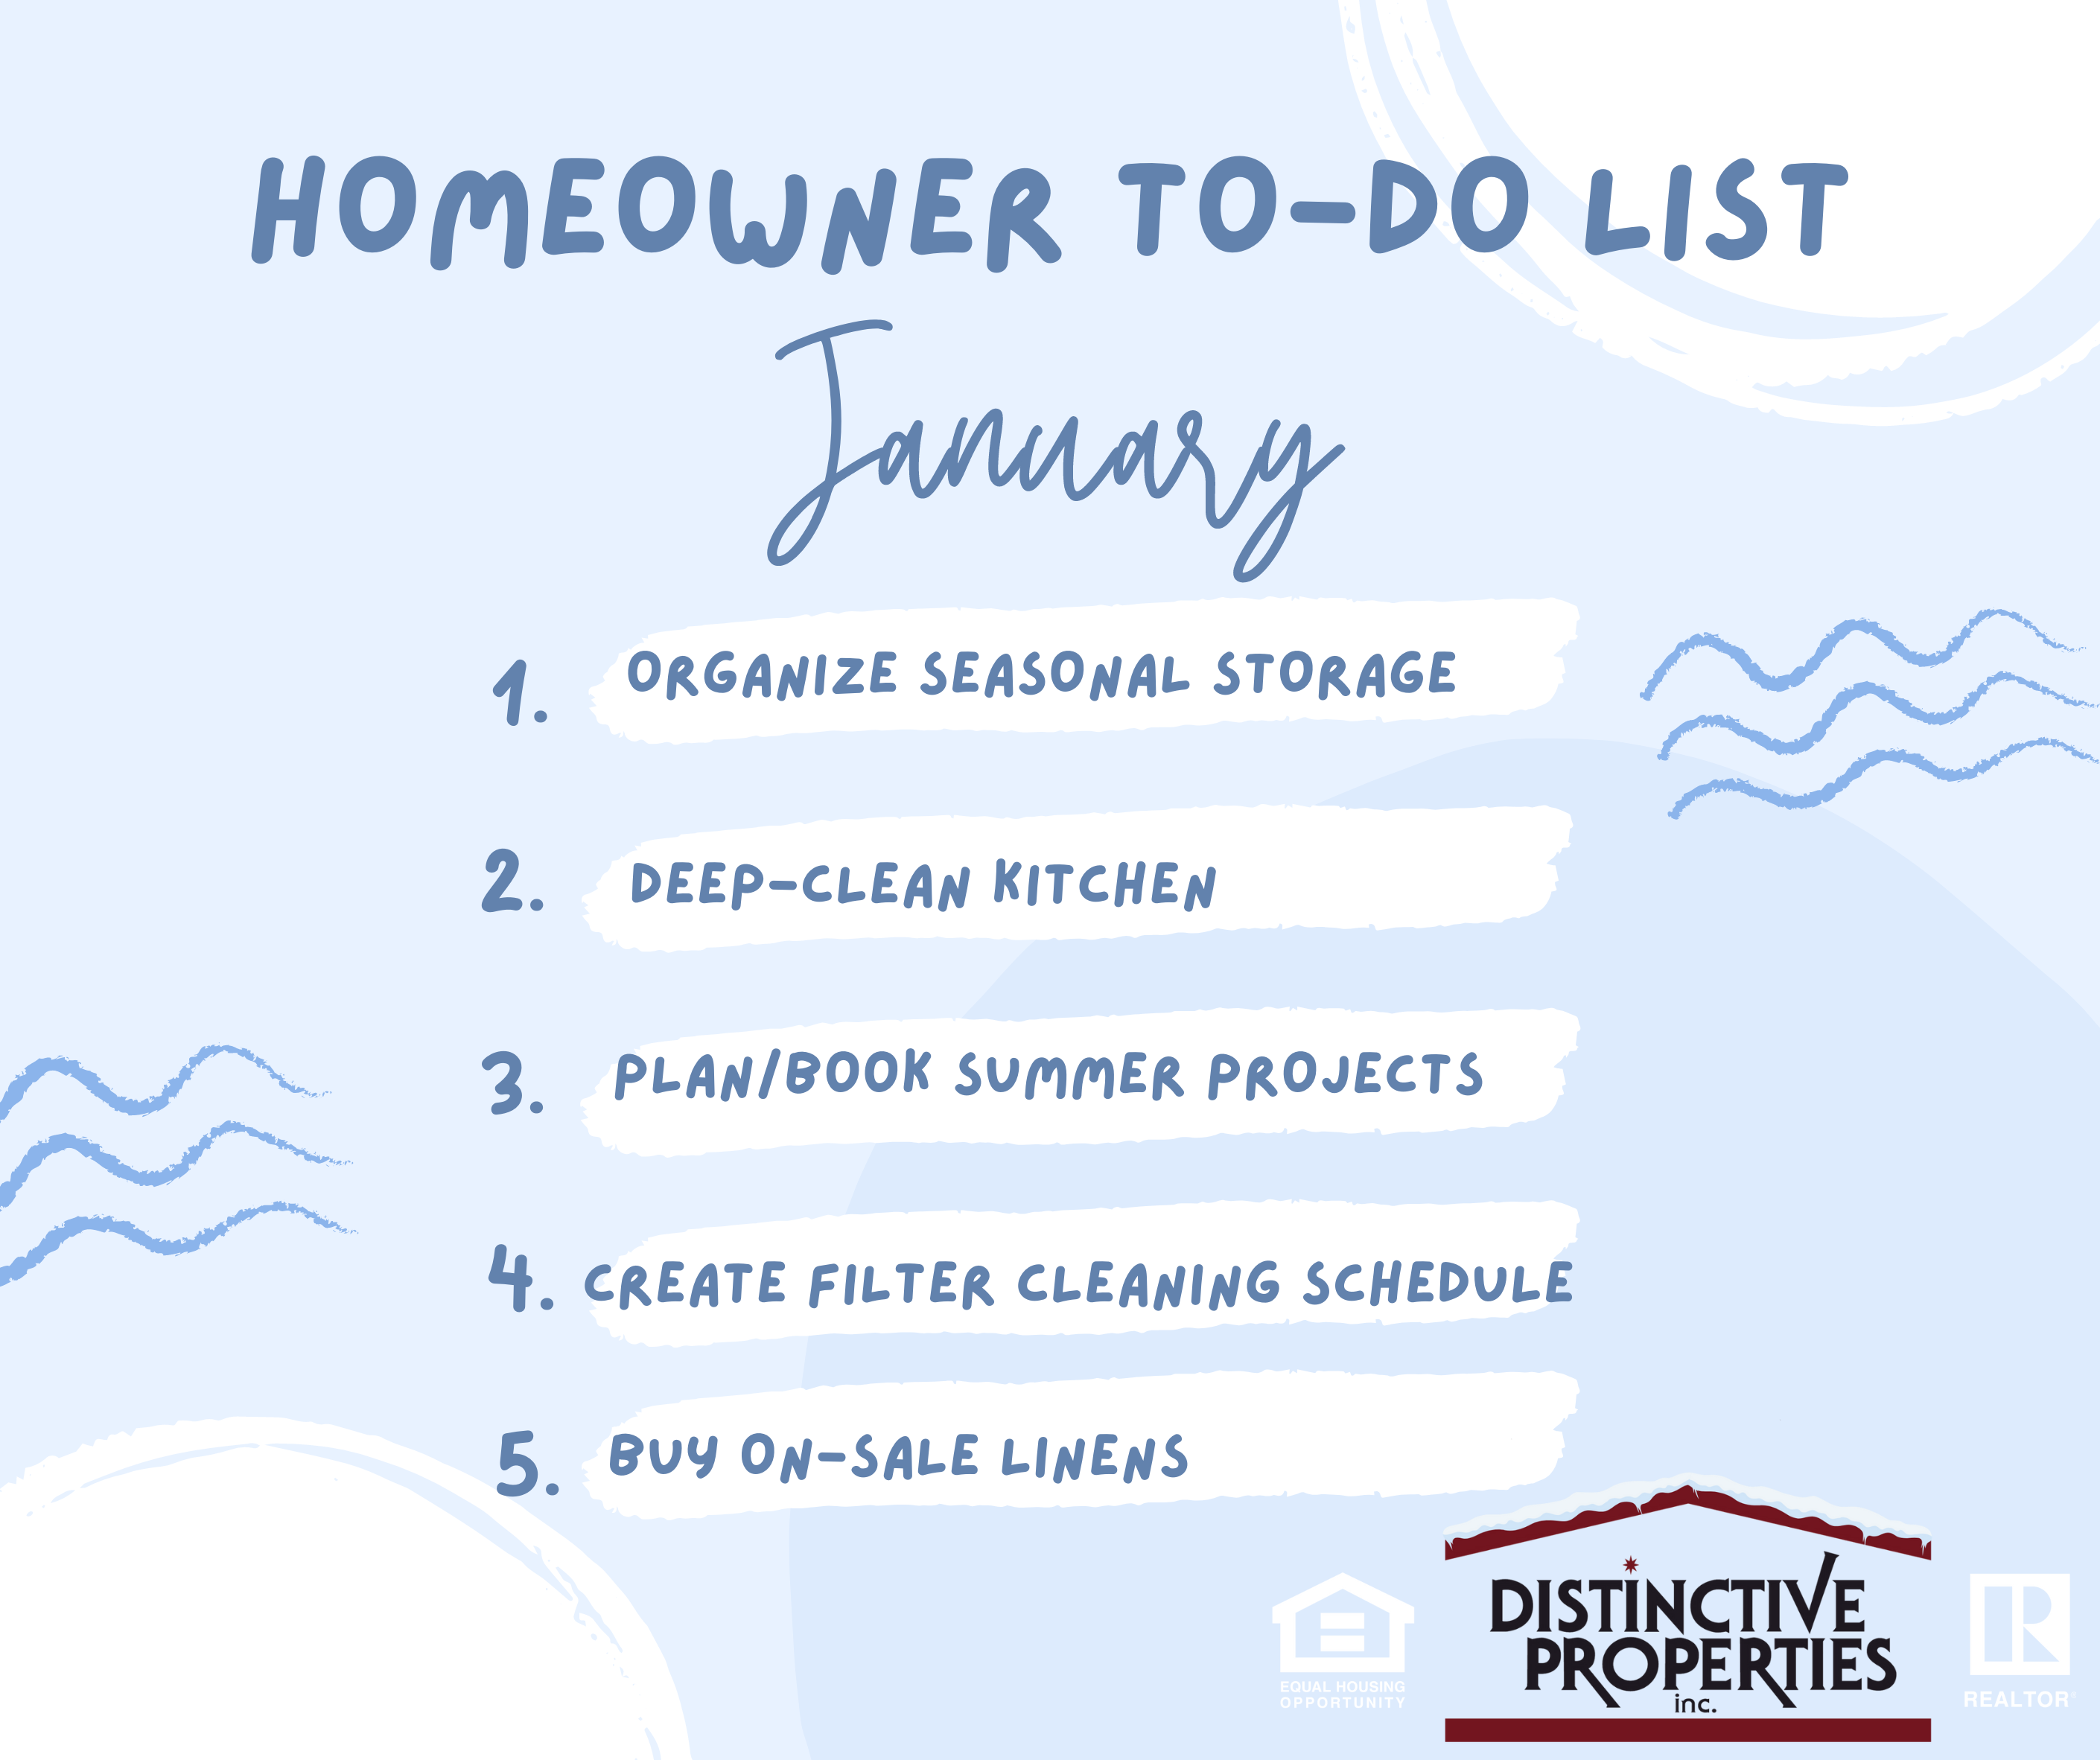
Whew. The holidays are done. The new year has rung in.
That’s when smart homeowners know it’s time to do these five things that’ll save time, money, and hassles all year long.
#1 Organize Your Seasonal Storage Space
Packing away holiday decor presents a big opportunity. It’s the best time to sort, declutter, and reorganize that space where you store your seasonal stuff.
So before simply stuffing your holiday things back in there somewhere, take inventory; then sort, filter, donate, trash, and re-home as many of your things as possible.
It’ll help keep you more organized all year long, and make it easier to find all your holiday stuff next year.
#2 Deep-Clean the Kitchen
All of that holiday merriment-making is rough on a kitchen. Give it a good deep cleaning now that the glittery dust has settled.
Purge your pantry and frisk your fridge, passing what you can on to local food banks. Scrub the walls and kickboards, and even pull those appliances right out from the walls for a thorough vacuuming to prevent gunk (and stinks!) from accumulating.
#3 Plan Summertime Projects Now (Especially if You Need a Pro)
Finalize plans for any landscaping, decks, patios, or other outdoor projects that need warm weather. Two good reasons:
1. If you’re DIYing, you’ll be ready to roll at the first hint of nice weather. That way, you’ll be less affected by any supply chain shortages and have your improved yard ready to enjoy by summer.
2. If you’re hiring a contractor or other professional, getting your bids and contracts in place now will save you from competing with the spring rush (wait too long, and you may not be able to book anyone!).
#4 Create a Schedule to Clean ALL Your Home’s Filters
It’s not just your HVAC. The filters in your fridge, your vacuum cleaner, your dryer, your air filter, and other household items need to be changed or cleaned at least once a year to be effective, usually more often — especially your dehumidifier. Yucky mold grows easily there.
Check manufacturer instructions for all the filters in your home, and create a master schedule; then add them to your calendar app to remind you.
#5 Save Some Green at White Sales
Linens and towels go on sale in January. It’s a long-standing retail tradition that started back when linens only came in white (hence the name), and it still has a solid rep as a money-saver — only in more colors today.
Cut your threadbare bath towels into rags and restock your supply, plus fill in any gaps in your bed linens you may have noticed if you had a house full of holiday guests.
“Visit HouseLogic.com for more articles like this. Reprinted from HouseLogic.com with permission of the NATIONAL ASSOCIATION OF REALTORS®.”