New homeowners may have heard that winterization is important, but in the hubbub of your first year living in a home you own (finally!), it can be easy to overlook the need to prepare for the cold weather ahead. After all, it’s just not something renters deal with; prepping pipes for winter is often the landlord’s job.
Ideally, you should winterize your pipes in the fall, before winter seriously sets in. But if you’ve forgotten and all of a sudden you’re in the middle of a deep freeze, there’s still time to prevent disaster.
Here are some easy techniques to save your pipes from bursting:
#1 Turn On Your Faucets If the temperatures have dropped into freezing and intend to stay there, turning on your faucets — both indoors and out — can keep water moving through your system and slow down the freezing process. There’s no need to waste gallons of water: Aim for about five drips per minute. #2 Open Cabinet Doors During cold weather, open any cabinet doors covering plumbing in the kitchen and bathroom. This allows the home’s warm air to better circulate, which can help prevent the exposed piping from freezing. While this won’t help much with pipes hidden in walls, ceilings, or under the home, it can keep water moving and limit the dangerous effects of freezing weather.
#3 Wrap Your Pipes If your pipes are already on their merry way towards freezing, wrapping them with warm towels might do the trick. You can cover them with the towels first and then pour boiling water on top, or use already-wet towels — if your hands can stand the heat (use gloves for this). This should help loosen the ice inside and get your system running again.
#4 Pull Out Your Hairdryer A hairdryer (or heat gun) can be a godsend when your pipes are freezing. If hot rags aren’t doing the trick, try blowing hot air directly on the pipes. Important note: You don’t want to use a blow torch or anything that produces direct flames, which can damage your pipes and turn a frozen pipe into an even worse disaster. You’re trying to melt the ice — not your pipes.
#5 Shut Off The Water if Pipes Are Frozen Have your pipes already frozen? Turn off the water immediately. (Hopefully you know where the master shut-off is, but if not, now’s the time to find it!)
Make sure to close off any external water sources, like garden hose hookups. This will prevent more water from filling the system, adding more ice to the pile, and eventually bursting your pipes — the worst-case scenario. This also will help when the water thaws; the last thing you want after finally fixing your frozen pipes is for water to flood the system — and thus, your home.
Visit HouseLogic.com for more articles like this. Reprinted from HouseLogic.com with permission of the NATIONAL ASSOCIATION OF REALTORS®.
While buyers are still seeking homes that offer safe, enjoyable shelter, new wish list items are emerging that give houses better design and function.
Home design trends that are expected to loom large in 2022 are an evolution of what started during the pandemic when life was disrupted and more homeowners started reevaluating their surroundings. Cases in point: the rise of the home office and backyard pools.
Some hot trends started years earlier, including energy efficiency, conservation of natural resources (especially in fire- and hurricane-ravaged areas), and affordable housing.
In addition, each cohort has its own wish list—baby boomers want lower maintenance and millennials want strong broadband connectivity.
One caveat: Know that there’s no universal agreement about what’s in and what’s out, even among our pundits who offered these ideas.
1. High-Speed Internet and Broadband:
A home office or workspace remains essential for many home buyers, but if a house doesn’t have a good digital infrastructure, work-from-home buyers may not be interested, says associate broker Lori Hoffman with the Usha Subramaniam Team at Compass in Chappaqua, a suburb of New York. “Young buyers coming from urban areas expect it, yet it’s not always available,” she says. Her advice is to make sure high speed is available for your buyers, and if it’s not, find an alternative before they invest.
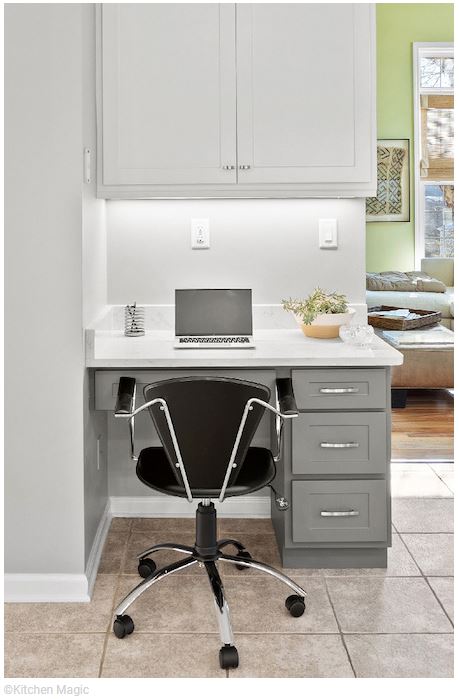
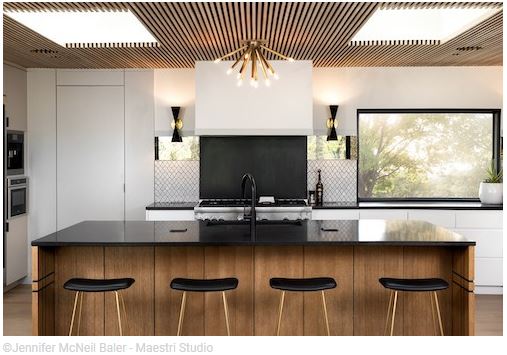
2. Quality, Quality, Quality: Location may still be king, but buyers want quality in building materials, systems, and appliances since they know how hard it is to secure materials due to supply chain disruptions and find a contractor who’s available and can get the work done right. “They don’t want inexpensive gray and white vanities with a composition top. They prefer something like a dark navy or sleek modern dark wood with a thick porcelain top, something that echoes Mid-Century style,” Hoffman says. They also want personalized items that suggest quality, such as a kitchen island that resembles a piece of furniture, says J.T. Norman, business development, product, and design innovation specialist at Kitchen Magic in Nazareth, Pa. Buyers also prefer that original brick is left unpainted but given trim that’s accented with a dark color, says architect Eddie Maestri, founder of Maestri Studio in Dallas.
3. An Encore for Home Theaters, and a Welcoming to Yoga Studios and Sophisticated Lounges:
After losing appeal because they took up too much space, home theaters are popular again as homeowners seek more at-home entertainment. Most are constructed on the first floor or lower level, says designer Joe Fava, CEO of Fava Design Group in Miami. A newcomer to the trends list is a yoga studio as homeowners look for ways to unwind and stay fit at home, he says. Maestri also has received more requests for an intimate living space—what he terms a lounge or parlor—that includes club chairs and a bar, but no TV.
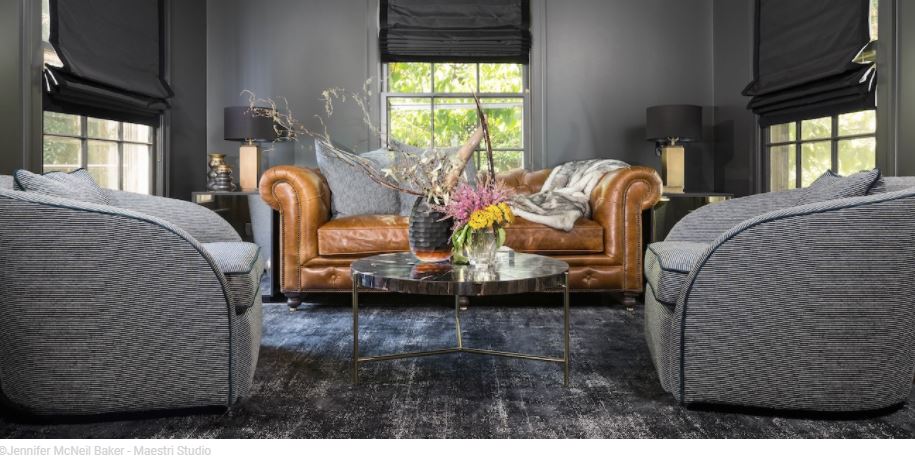
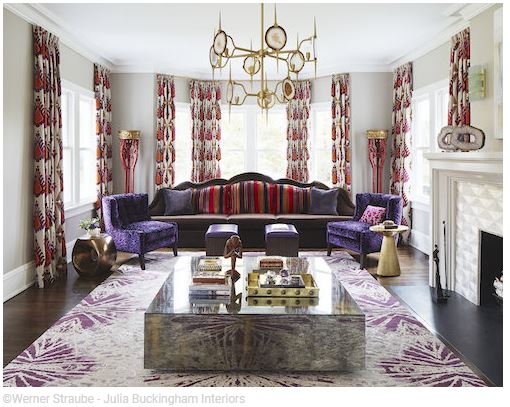
4. Purple is the New Gray (or Black):
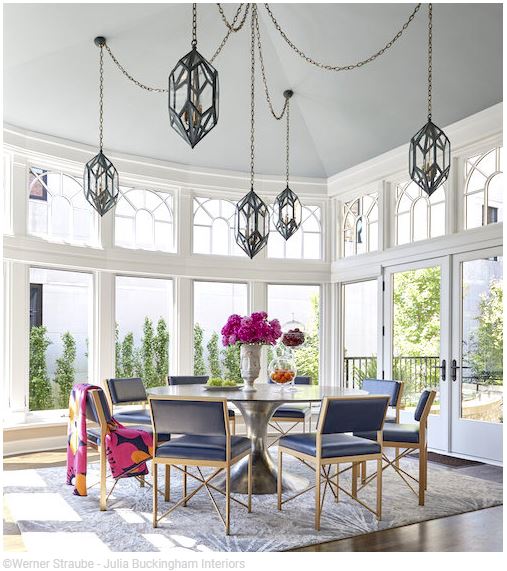
Once considered the color of royalty, purple has become one of the “reigning” requests in the increasingly colorful world of home design, says Scottsdale, Ariz.–based designer Julia Buckingham of Julia Buckingham Interiors. “It’s a jewel tone that is both rich and neutral as a base for bright or more earthy hues.”
In one project, she mixed it with a lively red and a natural stone chandelier. “It plays well with both vintage and modern, which makes my ‘Modernique’ heart very happy,” she says.
Norman says an earthy khaki green is also a current favorite choice. Color expert Amy Wax of Your Color Source predicts the popular colors in 2022 will relate to nature. She anticipates softer greens, earthy taupes, warm browns, and off-whites. We may also see a nod to happier times and a carefree lifestyle in the form of brighter teals, Kelly greens, peaches, and oranges.
5. More Outdoor Changes:
Having a yard or balcony gained ground during the pandemic and remains a big draw for buyers. As homeowners spent more time outdoors, their wish list for that space evolved. Hoffman finds that buyers want a flat yard that’s more usable than a hilly one. More people want a pool, so much so that many installers are booked into next year. Huntsville, Utah–based landscape architect Laurie Van Zandt of The Ardent Gardener says she usually designs one or two a year, but in 2021 she designed eight. A fire pit is also still high on wish lists, but an elaborate outdoor kitchen with a pizza oven and beer tap has waned in popularity—many found they rarely use these bells and whistles. What’s needed is a good 42-inch grill and cabinetry, says Chicago kitchen designer Mick De Giulio of de Giulio Kitchen Design.
When it comes to furnishings, Van Zandt says several clients have asked for nostalgic items that remind them of their grandparents, such as a porch swing, or have wanted to reflect their heritage through plant choices, colors, or design items. They also favored less-manicured gardens and yards with native grass seed blends.
Greenwich, Conn.–based landscape architect Janice Parker says she has started incorporating lighting that looks like it comes from a natural source, such as candles. In climates where bugs are prevalent or homeowners want to extend their outdoor enjoyment, there’s greater interest in screened porches, says home staging expert Kristie Barnett of Nashville-based The Decorologist. To connect outdoor or quasi-outdoor spaces to indoors, more homeowners are replacing windows with movable glass walls, says Norman.
6. Mid-Century Modern + Contemporary Chic: Design styles vary, but there’s agreement that a house with Mid-Century Modern architectural details and home furnishings stay a favorite, followed closely by contemporary, so long as the latter is warm and inviting rather than cold and spare, says Fava.
7. First-Floor Bedroom: Yes or No?
Some experts say a house without a first-level bedroom is challenged. Not so, says Hoffman, who says it depends on who’s sleeping there. “It’s more important to boomers. My younger buyers considering a two-story home want all the bedrooms to be together on the upper level,” she says.
8. Open Plan Living? Yes, But … While there’s no single plan that appeals universally, Hoffman finds that most of her buyers still want an open concept plan. “A choppy plan with rooms broken up takes longer to sell, and the kitchen has to open to some sort of family room. However, the dining room can be its own room,” she says. When there’s a separate traditional living room, she finds her buyers ask, “What do I do with this room?” Others say the openness between rooms is closing a bit. “Homeowners still want sight lines from a kitchen to family room, but they no longer need rooms in a row and prefer some separation, maybe, with pocket doors or an island,” says Maestri.
9. Maximalism:
The minimalism of the last few years is fading, while maximalism is soaring. What that means is rooms are being filled with comfortable furnishings, rugs, art, and collections with character, according to Laurel Vernazza, home design expert at The Plan Collection, a company that sells house plan designs. The fresh look doesn’t mean crowded, overstuffed spaces. One way to achieve the look is by mixing materials, like stones, metals (lots of bronze and less polished chrome and brushed nickel of recent years), fabrics with a nubby feel, different woods, and trendy matte black hues. “It’s a way to add richness,” says Fava, who finds clients want cocktail tables with several metal finishes or sofas with a metallic base. Another way to inject the look is to use curved elements instead of straight lines, such as arched openings, barrel-vaulted ceilings, and curvy furniture and walkways, says Vernazza. There’s also more architectural detail like fluting, Maestri says.
10. Spotlight on Ceilings:
Periodically, the fifth wall of a room gains prominence. Now is one of those moments. The ceiling is being designed to stand out and be more attractive. Dated ceilings, such as those with the popcorn look, textured Styrofoam, or bumpy stucco are being targeted by homeowners for remodeling. Ted Speers, president of The Patch Boys, a national drywall, ceiling, and plaster repair franchise, suggests owners first test for asbestos, then scrape off the texture, repair the ceiling with drywall compound, and sand.
In upper-level rooms, designers like Buckingham make lighting fixtures the focal point of a ceiling or stairwell to create a modern art display that adds height, volume, and a light play when lit. But the caveat, she says, is that it can be a “beast to navigate the correct proportions and heights.” That’s where an interior designer can help. What’s out, she says, are small, mass-produced, lantern fixtures in an industrial or farmhouse style. Maestri likes to use high-gloss paint for reflectivity or wallpaper.
11. Smaller, But Not Tiny: Ever since author and architect Sarah Susanka published her first book on smaller homes in 1998, The Not So Big House, there’s been interest in how smaller homes can offer comfortable, functional living. Author Sherri Koones’ book, Bigger than Tiny, Smaller than Average, also explores the subject. Smaller houses—2,000 square feet or less—are in high demand but short supply. The reasons for their popularity, Koones says, are that people are getting married later and having fewer children, while boomers are opting for smaller homes. Certain features help spaces look larger and function better, such as integrated outdoor areas, high ceilings, light-colored walls, open floor plans, well-placed windows, and niches and hallways that serve as workspaces.
12. All-Electric Homes:
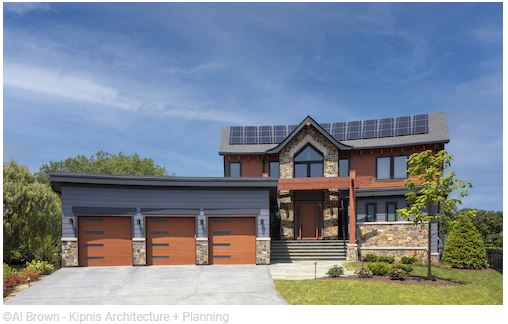
More homeowners understand the importance of “decarbonizing” everything from products to transportation, and especially their homes, says Chicago- and Boulder, Colo.-based architect Nate Kipnis of Kipnis Architecture + Planning. “The way we can best do this is by eliminating all fossil fuels use from houses and including induction cooktops rather than gas for cooking, which offers safer, faster, and more even cooking,” he says. Kipnis recommends using either an air-source heat pump (mini-split) for the HVAC system or a ground source system (geothermal). The big payoff, he says, is that renewable energy has become the cheapest form of electricity generation.
13. Multifamily Breakout Spaces:
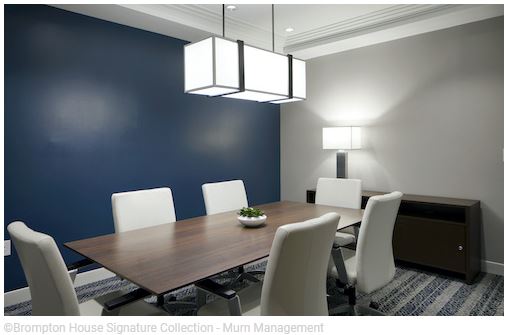
The pandemic taught developers and managers of multifamily buildings the importance of flexible shared spaces for socializing and work, termed breakout rooms by some. All the buildings that Keith Gillan’s Maryland-based firm Murn Management runs include such spaces for shared use, plus smaller conference rooms on each residential level. Another change in his company’s buildings is bigger residential units to facilitate working from home. “It’s not that much more expensive to do so at the beginning of the design process and be sure every apartment has a den,” Gillan says.
Bonus Trend: New Model for Affordable Multifamily Living
In urban centers, affordable housing is in great demand, yet there are often obstacles to developing it. A new zoning rule in New York is giving rise to a new way to bring affordable units to underserved neighborhoods—it’s termed “transgenerational housing.” An early example of this growing trend now occupies the corner of 700 Manida St. in the Bronx’s Hunts Point neighborhood. Designed by RKTB Architects for nonprofits MHANY Management and Nos Quedamos, Phoenix Estates II is one of the first developments to employ the Affordable Independent Residences for Seniors program, a modification of Zoning for Quality and Affordability rules that the city adopted in 2016. “Utilizing the new rule made the project financially feasible by including senior units in the development plan, which increased the amount of developable floor area allowed on the site by 45%,” says RKTB principal Alex Brito, lead architect on the project. Of the 108 studios and 1-, 2-, and 3-bedroom units, 100% are affordable and 48 studios and one 1-bedroom unit are reserved for seniors. The programming for Phoenix Estates II also commingles seniors and families rather than group them separately. The result fosters a sense of community and a more stable and positive living environment for all. The project team’s success in leveraging an obscure zoning rule is inspiring other designers and nonprofit developers to follow.
Copyright National Association of REALTORS®. Reprinted with permission.
Countdown to a perfectly clean guest-ready home no matter how much — or little — time you have.
It feels great to have a clean, organized, well-functioning home when you’ve got guests coming. Especially around the holidays. It’s like your gift to you.
Here’s how to get that satisfying feeling — no matter how much time you have. Just choose your starting point on this checklist:
Three (or More) Weeks to Go
Think big picture. Get anything that requires a pro or installation out of the way now. No one wants calamity to strike when guests are pulling into the driveway.
– Get your HVAC maintained if it’s overdue. – If you have a self-cleaning oven, clean it now. An oven is most likely to break down during the cleaning cycle, so don’t save this task for last. – Replace any appliance on its last legs. You don’t want your hot water to go out or fridge on the fritz with a houseful of guests. – Steam-clean upholstery. (Or hire a pro. It’s a big job.) – Hire a handyman for those repairs you’ve been putting off. – Check outdoor lighting. Replace old bulbs and call an electrician to address any bigger issues.
Two Weeks to Go
It’s not panic time yet. Focus on decluttering and a few deep-cleaning tasks now, and you’ll have a more manageable to-do list when the clock really starts ticking down.
– Do a deep declutter. It’ll make things easier to keep clean. – Dust ceiling fans, light fixtures, and high-up shelves. – Wipe down baseboards. – Clean out and organize the fridge. – Wash windows to make the entire house feel brighter and cleaner. – Toss washable shower curtains and drapes in the washing machine and rehang. Easy.
One Week to Go
It’s strategic cleaning time. Here’s what to tackle now — things your family won’t easily undo before your guests arrive.
– Declutter again. – Vacuum and dust guest rooms. If they’re low-traffic, the cleanliness should hold with just a quick wipe-down right before they arrive. – Wipe down walls. – Wipe down kitchen and dining room chairs and tables, including the legs. You’d be surprised at how grimy they get. – Deep clean the entryway — and make room for your guests’ stuff.
72 Hours to Go
The final cleaning stretch is on the horizon.
– Do another declutter. – In the kitchen, toss stove burners, drip pans, and knobs into the dishwasher for an easy deep clean. – Wash kitchen cabinet fronts. – Scrub the kitchen floor. – Clean and shine appliances.
48 Hours to Go
Now it’s time to get serious.
– Clean and sanitize garbage cans to banish mystery smells. – Wipe down doorknobs, faceplates, and light switches. They’re germ magnets. – Clean the front door. – Deep clean the bathroom your guests will use and close it off if possible.- – Wash guest towels and linens.
24 Hours to Go
Your guests’ bags are packed. Time for final touches.
– Do a final declutter. By now it shouldn’t take more than five minutes. – Give one final wipe-down to toilets, tubs, and bathroom sinks. – And another final wipe-down in the kitchen. – Do all the floors: mop, vacuum, sweep, etc. – Make guest beds and set out clean towels. – Plug in nightlights in guest baths. – Put out guest toiletries so they’re easy to find. – Add a coffee or tea station in the guest room or kitchen. – Get your favorite smell going, whether it’s a scented candle, spices in water on the stove, or essential oils. – Use rubber gloves to wipe off pet hair and dust from furniture. It works. – Do the full red carpet: Sweep or shovel porch, steps, and outdoor walkways.
Visit HouseLogic.com for more articles like this. Reprinted from HouseLogic.com with permission of the NATIONAL ASSOCIATION OF REALTORS®.
Quick-and-easy tasks that’ll brighten up your interior.
December.
The year’s coming to an end. Time to do four small tasks for a bright (and money-saving) new year. #1 Clean Light Bulbs and Fixtures
Two great reasons to clean your light bulbs: You want as much light in your house as you can get as the days grow shorter, and, you’ll save money.
Dirty bulbs apparently shed 30% less light than clean ones, according to the U.S. Department of Energy.
Wipe bulbs with a cloth dampened by a mix of 1 oz. dish soap, ¼ cup white vinegar, and 3 cups of water. Get to it Dec. 1 so you’re ready for the curtain fall on the shortest day of this year: Dec. 21.
#2 Evaluate Homeowner’s Insurance
The holidays. You love them, but they do seem to eat up more cash than other times of year. Sure, you can scrounge around for change under your couch cushions, but that’s not going to offset much.
Why not get a home insurance checkup? Call your agent to go over the type of coverage you have, how much you really need, and how you can lower your premiums before your next monthly installment.
#3 Pack a Home Emergency Kit
The last thing you want during the holidays is for an emergency to chill your family’s cheer. Prepare for power outages and weather-related emergencies with an easy-to-find emergency kit.
Some items to include are bottled water, a hand-crank radio, a flashlight, batteries, a portable charger for your phone, warm blankets and, of course, a first-aid kit to patch up any boo-boos. Singing carols ’round the flashlight may not be ideal, but it’ll beat trying to celebrate in the dark.
#4 Buy Holiday Lights (After Dec. 25)
It’s tough to think about next Christmas when you’re still stuffed from a holiday dinner with all the trimmings. But think you must if you want to save on next year’s holiday. From Dec. 26 through year’s end, big-box stores try to clear the shelves of all that glitters.
Visit HouseLogic.com for more articles like this. Reprinted from HouseLogic.com with permission of the NATIONAL ASSOCIATION OF REALTORS®.
Give or take a Scrooge or two, everybody loves the holidays: Decorating the tree, hanging lights, hanging holly — all those things! But you know what nobody loves? Taking all those things down.
Because, wow, what an unorganized mess.
Before you go all Scrooge, get your jolly back with these simple holiday decorating hacks.
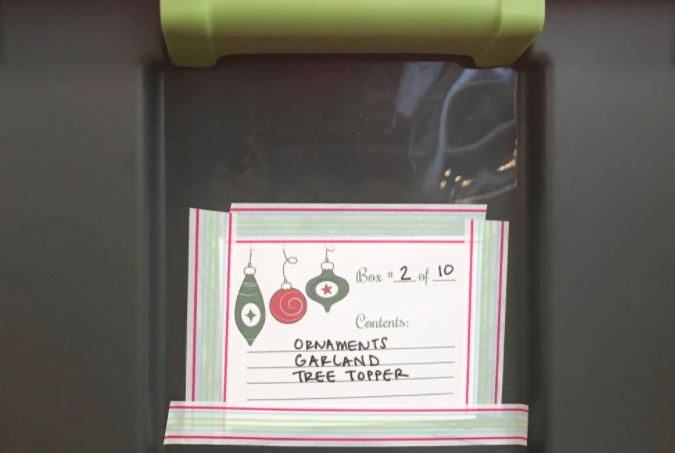
#1 Protect Ornaments With Holiday Recyclables
Trimming the tree should feel like the happy ending of a Lifetime holiday movie, not a game show guessing which box will contain broken memories.
Keep ornaments safe for next year by stowing them in leftover party cups, hot-glued onto a piece of foam board cut to fit inside a storage bin, recommends Lisa Woodruff, a Cincinnati-based professional organizer.
Or pack ornaments away using bubble wrap from holiday packages, or egg cartons from those countless cookies you made.
All of these options make for shock-absorbent padding that’s more durable than paper towels or tissue paper.
#2 Create a Year-Round Focal Point
You dream of decking every hall, every year, but when the holidays roll around, you’ve got a brisket to bake and cocktails to clink.
So focus your festive energy on just one iconic focal point — a wreath on the front door or greenery on the mantel — something that easily changes with the seasons.
Or, create a display that makes you feel merry year-round. (Try repurposing storefront letters to spell out “LOVE” or “JOY” — sentiments that never go out of season.) #3 Get a Decorating Toolbox
Before you can hang a single strand of lights or sprig of mistletoe, you have to find the gosh-darn zip ties, track down the floral wire, and repurpose a few extension cords.
Just thinking about the prep work makes you ready for a long winter’s nap. But this year’s gonna be your prep for next year and the years to follow.
As you put everything up, keep a running checklist of what you need. Then stock a toolbox that gets replenished every year.
#4 Leave Your Light Hooks and Nails in Place for Next Year If you like to trim your home’s roof and siding with holiday lights, you know what a hassle it is to find last year’s nail holes while balancing on a ladder with your extremities slowly freezing.
So, this year, use hooks that match your siding (not nails because they fall out easier) or paint them so they are indistinguishable from your siding or trim before you put them up.
Then leave them up when you take down your lights.
Come next year, just rehang your lights and bask in your twinkling success.
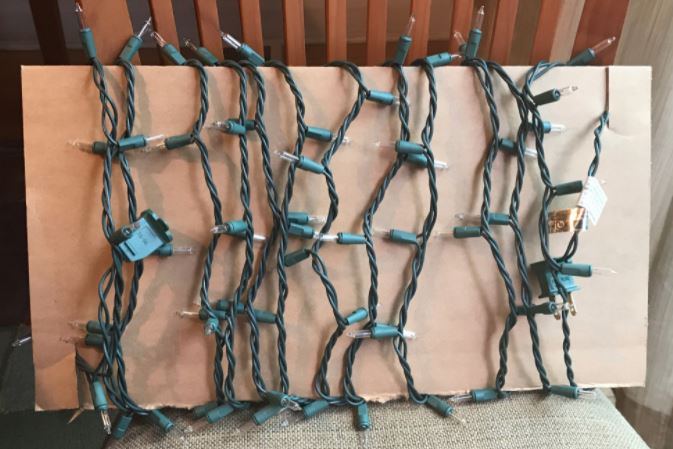
#5 Wrap Lights Around Cardboard
There’s nothing like a multicolored knot of lights to put a damper on your bright holiday spirit.
So as you take down this year’s lights, wrap them around empty gift boxes or cardboard. Make a small notch on each side to keep the ends snugly in place.
Next year you’ll spend less time untangling your lights and more time basking in them.
#6 Hang Wreaths on Rods or in Rafters
All year you look forward to hanging that wreath you got for a steal at an after-Christmas sale.
Rather than tossing it in a trash bag, where it can too easily get seriously mushed or even forgotten, hang it on a rod or from nails hammered into the attic rafters or garage walls, Woodruff recommends.
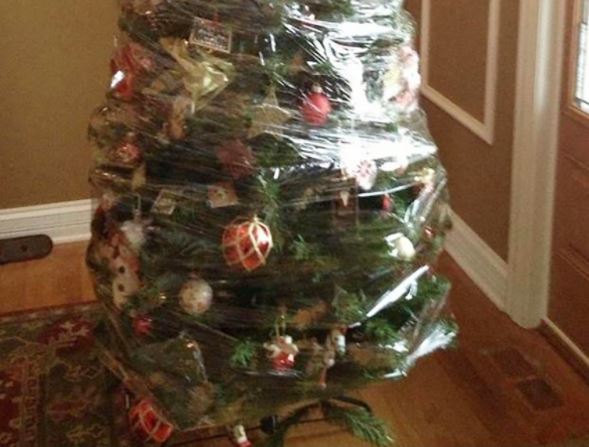
It will be easy to find, and will be in pristine shape for next year. #7 Store Your Tree With the Decorations on It
No, seriously.
If strategizing the placement of skiing Garfield and his 107 dangly friends is your least favorite part of holiday decorating, skip it after this year.
Ask someone to help you tightly wrap this year’s decorated (artificial) tree — yep, ornaments and all — with heavy-duty stretch plastic wrap (the type that professional movers use, which you can find at home improvement stores).
Next year, just cut the wrap and reshape the branches.
Happy holidays indeed.
#8 Or Give In and Buy a Tree Bag
Every December 26, you begin to dread awkwardly wrestling your artificial tree back into its original packaging.
This year, go ahead and spend the 50 bucks on a tree bag or box, Woodruff says. It will seal out dirt, dust, and bugs, won’t smash the branches, and some styles even allow you to store your tree fully or partially assembled.
Plus, just knowing you can skip the reassembly next time makes for an extra happy New Year.
#9 Trim Those Trimmings
Getting out decorations should be a welcome walk down memory lane — not a guilt trip through items you “should” display but ugh.
So when you take down this year’s decor, follow the old rule for paring down your wardrobe and get rid of anything you didn’t use — you know, that carol-singing mounted fish from your dad or Nana’s crocheted coaster set — and donate them.
“If it’s a sentimental item, take a picture of it,” Woodruff says.
You won’t waste storage space, and come next year, you’ll be greeted only by items you love and use.
#10 Organize By Room If you’ve got snowmen in every bathroom and a jingle bell on every drawer, you may end up with mountains of half-empty boxes piled everywhere for longer than you spend enjoying the decor.
Get your halls decked more efficiently by sorting your boxes of trimmings by room, Woodruff suggests.
Then, label each light strand by location — mantel, doorway, tree, etc. Decorating is merrier when you can grab a bin and make an evening of it, one room at a time.
#11 Create a ‘Must-Have’ Bin
\Put all your favorite decorations in one “first-up, last-down” bin.
Next year, you’ll spend more time enjoying your cherished menorah or manger and less time rummaging to find it.
Visit HouseLogic.com for more articles like this. Reprinted from HouseLogic.com with permission of the NATIONAL ASSOCIATION OF REALTORS®.
Selecting a beautiful new light fixture for a home is a great way to visually update a home and add sparkle to a space. But putting the wrong lightbulb in that fixture can have disastrous effects. The wrong lighting makes a room feel too dark or too bright. Light also affects the appearance of upholstery, paint, or artwork.
Comparing lighting options available today can be like comparing a Model T with a Prius because of the vast options—both old-school and new—on the market. With energy consciousness steadily rising, the expansion of federal legislation mandating lightbulb efficiency is now being reconsidered by the Department of Energy, and some states, including California, Nevada, and Washington, already have strict laws in place. The 60-watt tungsten bulb is, indeed, becoming a Model T.
Just as you can still find gas-guzzling cars, however, you can still purchase incandescent bulbs. However, you need to understand the terminology surrounding new light sources.
Lightbulb Types LED, CFL, and halogen and tungsten incandescent: LED is the most energy-efficient and long-lasting; it’s also the most expensive. Tungsten incandescent bulbs are the least efficient and cheapest; 90% of the energy consumed by an incandescent bulb is lost as heat. CFLs contain mercury and must be disposed of properly.
Bulbs come in any number of shapes and sizes. When shopping, the most common lightbulb shape and size is described as an “A19 Medium Base.”
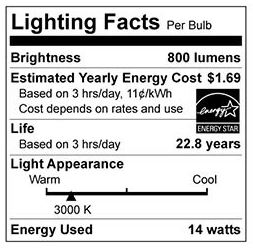
Brightness: Light output is measured in lumens, not watts as we previously used for brightness. In context, a 60-watt incandescent bulb provides roughly 800 lumens: 40W, 450 lumens; 75W, 1100 lumens; 100W, 1600 lumens; 150W, 2600 lumens.
Energy Used: The amount of electricity that a lightbulb consumes is measured in watts. A 60W tungsten bulb consumes 60W. An 800-lumen LED bulb (equivalent to the 60-watt tungsten) uses approximately 14W of electricity, a 75% reduction in energy consumption. Efficiency is often expressed as lumens per watt; the higher the LPM ratio, the more energy-efficient the bulb.
Light Appearance: We understand lightbulbs described as “warm white” or “bright white,” but these are subjective terms, meaning different things to different manufacturers. Light appearance refers to the “color” of the white light. Light color is represented in Kelvin, a temperature measurement. 2700K is roughly the equivalent of a tungsten bulb; 3000K roughly the equivalent of a halogen bulb; 4500K considered equivalent to daylight, and appears blueish.
2700K lighting is warm and cozy, great for living rooms and bedrooms. 3000K lighting is crisper and best used where functional light is important, as in a kitchen or bathroom. 4000K is great for the garage or laundry room. Make sure that the lamps and ceiling lights in a room have matching Kelvin ratings. Nothing’s worse for a room’s appearance than mismatched light color. A bedroom with 2700K lighting at the ceiling and 4000K in the nightstand lamp looks awkward and will create an imbalance in paint and fabric colors.
Dimming: Ever say, “let’s dim the lights” to create a little romance or watch a movie? When incandescent bulbs are dimmed, their color warms, meaning that it changes to look more like candlelight.
Look for the word “dimmable” as a feature on the lightbulb package or integrated LED fixture. Unlike incandescent lighting, not all LED or CFL lights can be dimmed. This is not a huge consideration for bulbs used in table or floor lamps, but ceiling lights, especially chandeliers, are often controlled by wall dimmer switches. Non-dimmable LEDs may not react and CFLs may turn a greenish-blue color. So much for atmosphere.
Further, LEDs and CFLs rated as dimmable will not warm to look like candlelight. They will simply get less bright while giving off the same color. LEDs offer a technology called “warm dim” that mimics the dimming of incandescent bulbs. Search for warm dim LEDs that offer a color range of 3000K to 2200K or wider.
Color Rendering: You probably won’t see the color rendering index of a lightbulb on its package. But this measurement is important when illuminating artwork or when highlighting decor, such as fabrics or paint colors. Low CRI ratings make the colors in a room seem flat, while high CRI makes color snap.
Sunlight, with a CRI of 100, has the most accurate color rendering; halogen matches sunlight with 100 CRI, which is why galleries often use halogen lighting. Most LED bulbs are rated above 85 CRI, which is considered acceptable; CFLs are somewhat lower. However, LEDs are available at higher CRI levels when color rendering is critical.
Copyright NATIONAL ASSOCIATION OF REALTORS®. Reprinted with permission.
In the 1980s and ‘90s, when houses were getting bigger and fancier with all sorts of specialty spaces—theaters with stadium seating, giant aquariums, rathskellers, and sports courts—some homeowners would bring in dozens of pieces of gym equipment, install cushioned flooring, line a wall with mirrors, and add a TV or sound system to create a home workout space that could rival a commercial fitness center.
That’s a costly investment, especially when some folks lose motivation and interest. Worst case scenario: Their treadmills and ellipticals machines become a clothing rack.
Then came the pandemic, and at its peak, six out of 10 members stopped going to their local gym. Two-thirds of those pursued a fitness routine on their own, according to a study by ClubIntel of 2,000 U.S. gyms.
Thanks to technology, there has been a huge uptick in Zoom and livestreamed workout options offered both by gyms that have designed hybrid in-person and online classes, as well as a host of entrepreneurs’ and manufacturers’ new exercise apps.
These make it easy to exercise at home and on the go and have inspired many homeowners to clear a room or space to do their jumping jacks, downward dogs, and bicycle rides—sometimes competing against strangers across the country or around the globe.
In fact, Houzz, the online home site, says since the beginning of the pandemic, it has seen a 156% increase in searches for home gyms.
But in this go-around, fitness experts say having a large, swanky space expensively outfitted with the latest cardio, weight training, and core-enhancing equipment is not essential.
Moreover, those items won’t guarantee added value to a house for resale except to those specifically looking for a finished workout room or an area where they can create one, says Linda Bright, a premier luxury specialist with Illustrated Properties in Palm Beach Gardens, Fla. If the room’s over-the-top, and buyers have no interest, it could be the first thing dismantled, says real estate salesperson Barb St. Amant of Atlanta Fine Homes, Sotheby’s International Realty.
However, having a smaller, appointed space offers benefits for those interested, says Nora Crosthwaite, a salesperson with RE/MAX Precisions, who also owns the online staging company, Stagerie. In her Des Moines, Iowa market, Crosthwaite says homeowners like to fix up basements for this purpose in the area’s many ranch-style homes. Homeowners should be sure a basement is dry before investing in any remodel.
In the case of homes without a basement or a separate room, clients can use a multipurpose space where equipment can be organized, Bright says. “It gives potential buyers an idea of how they might use the room in different ways to show its flexibility, which is what many buyers are after, especially now when there is such low inventory,” she says.
All sorts of rooms offer this potential, including an oversized bathroom, sitting area off a bedroom, home office, walk-in closet, garage, accessory dwelling unit (ADU), or outdoor area in good weather, says Melissa Wirt, founder of Connexusliving, which brings amenities and fitness classes to multifamily communities through content from the company’s base in Murrells Inlet, S.C.. “What’s important,” she says, “is that a homeowner can enter a space or area and focus on the programming they choose rather than specific equipment.”
What also helps make an indoor room suitable is good ventilation, natural or artificial lighting, a proper floor—rubber matting, luxury vinyl tile (LVT) planks, carpeting, or wood flooring with cushioning underneath, and a mirror to maintain proper form and alignment, depending on the activity, says Wirt. Any of these items should be easy to switch out to make the room function for another purpose. Ceiling height is also important, and why some basements shorter than 8’ won’t work, Crosthwaite says.
In setting up the room or area, homeowners should arrange items to be accessible. “They shouldn’t have to move the coffee table every time they work out,” says Cathy Spencer-Browning, vice president of programming and training at Atlanta-based MOSSA, which provides group fitness programs and MOSSA on Demand, including a range of classes via streaming for homeowners.
Minneapolis-based Wellbeats offers more than 900-plus classes in a range of exercises for close to 2,500 multifamily buildings and other wellness-minded businesses, says Tim Bowen, senior vice president of sales. “The digital world is meeting the need for knowledge and versatility in working out, not with equipment that replicates a gym but by offering people great instruction and a way to be both movement and mindfulness oriented,” he says. “Consumer behavior has changed. They may not race to a gym then to work, but if working from home they may want a break, even a one-minute breathing exercise.”
Establishing an exercise routine that appeals is critical, says Spencer-Browning. “The best workout to do at home is the one they’ll stick with because they enjoy it,” she says. They should ask: Am I a self-directed exerciser or prefer to be told exactly what to do? If they’re not sure, they should try out a few choices and if they like it, support it with a few accessories that help pursue it such as a mat for yoga, along with music, a TV, or candles, she says. “Otherwise, they won’t continue. This is why there are so many bikes for sale on eBay!” she says.
Wirt also suggests finding content with a trainer whose workouts appeal and offers new challenges to make exercising fun. “We can’t lose sight of the social aspect of feeling connected with people,” she says.
Hudson Valley, N.Y., fitness trainer Regan Szczepanowska, a former professional dancer, says it’s important that the trainer—whether virtual or a person they meet with live—has proper training, which can be checked by looking at their credentials such as from an organization like the American College of Sports Medicine or the National Association of Sports Medicine. “Then, they should make it part of their lifestyle to be diligent,” she says.
By making careful selections, a homeowner can meet all their workout needs, whether cardio, strength training, flexibility, mobility, or mindfulness.
Copyright NATIONAL ASSOCIATION OF REALTORS®. Reprinted with permission.
Outfitting your basement and attic with efficient storage can be life-changing. Not only will you get more living space, it can give your home an edge over others when it comes time to sell.
Try these ideas to get the most storage out of your home, while freeing up more floor space for you.
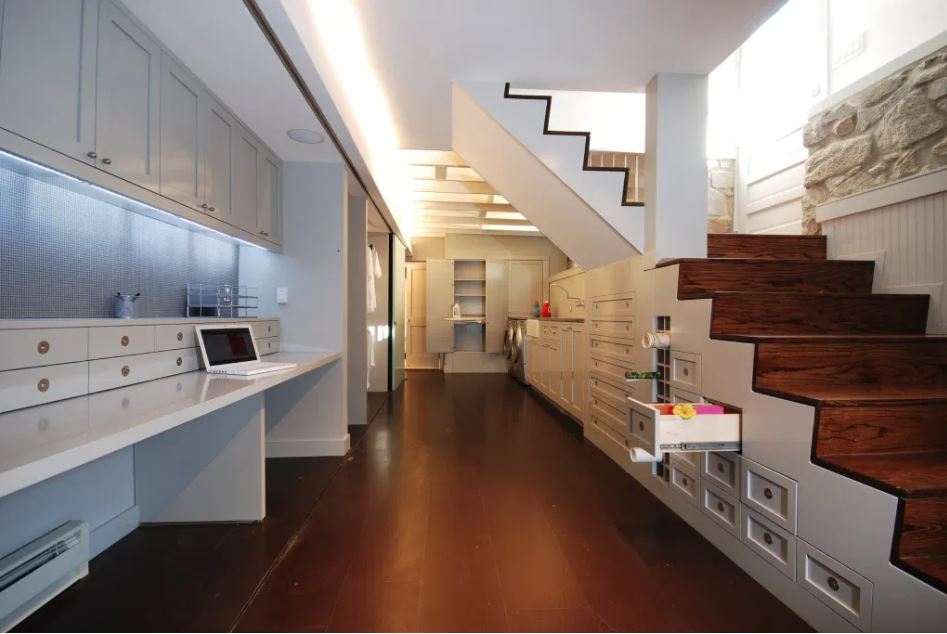
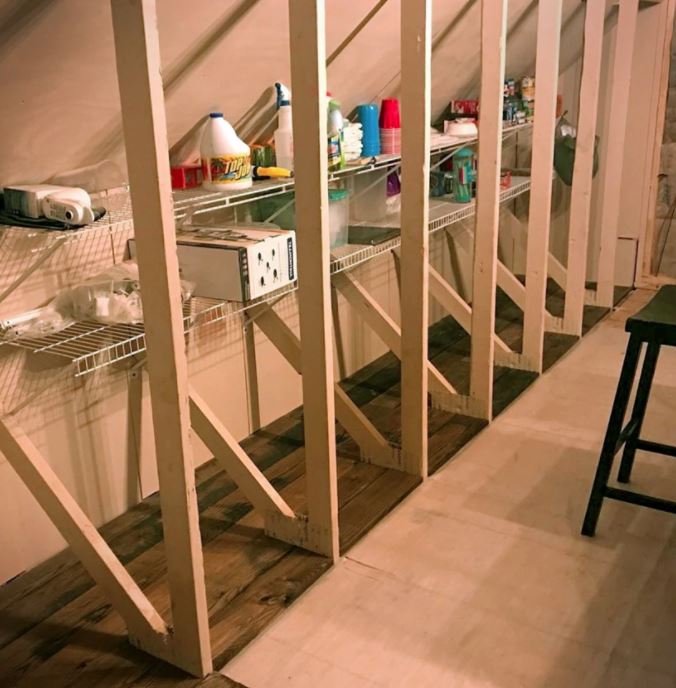
Conceal the Mess With Built-Ins
Expand your idea of built-ins: they’re not just for your upstairs living room, and this value-adding upgrade is easily DIYed. Break out your power tools or work with a carpenter to craft wall-to-wall shelving for this über-useful storage idea.
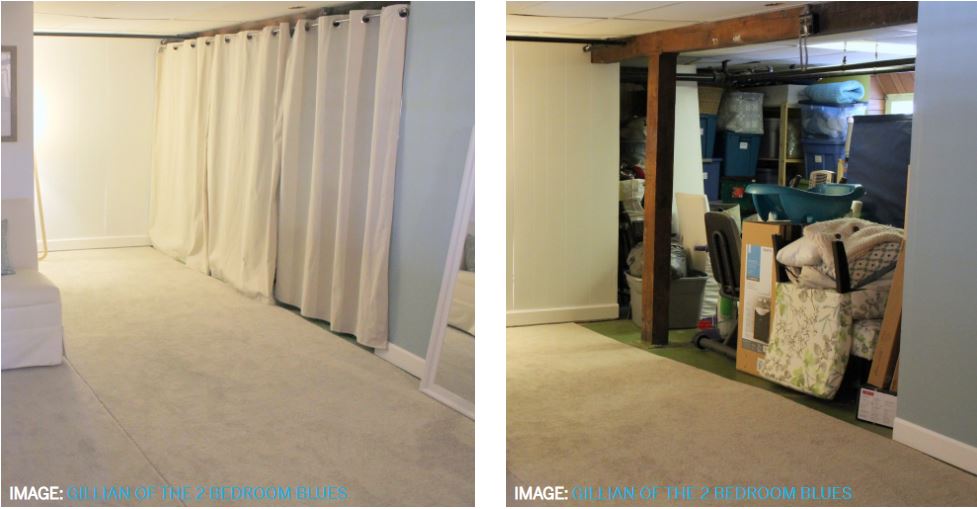
Cover With a Curtain
Let’s face it: Your off-season tubs will never be glamorous. But they can stay out of sight, even if you don’t have to budget for built-ins.
Dividing a basement room in two gives you the best of both worlds: the bonus living space of a finished basement and a dedicated storage area. It’s also money-smart, because you’ll get those finished-basement benefits without the wall-to-wall costs.
The key? Visual separation between the two. Science says clutter makes us anxious, so this basement storage idea suggests hiding the mess with a curtain. Choose a heavy curtain to keep out the basement chill.
Take Advantage of Rafter Space
Don’t let imposing rafters limit your imagination: This awkward space is eager for a smart storage solution. Long, wall-to-wall shelves provide plenty of horizontal space for those pesky must-haves you don’t need every day, like picnic supplies, seasonal dishes, and niche cleaning supplies, leaving your other spaces neat and tidy.
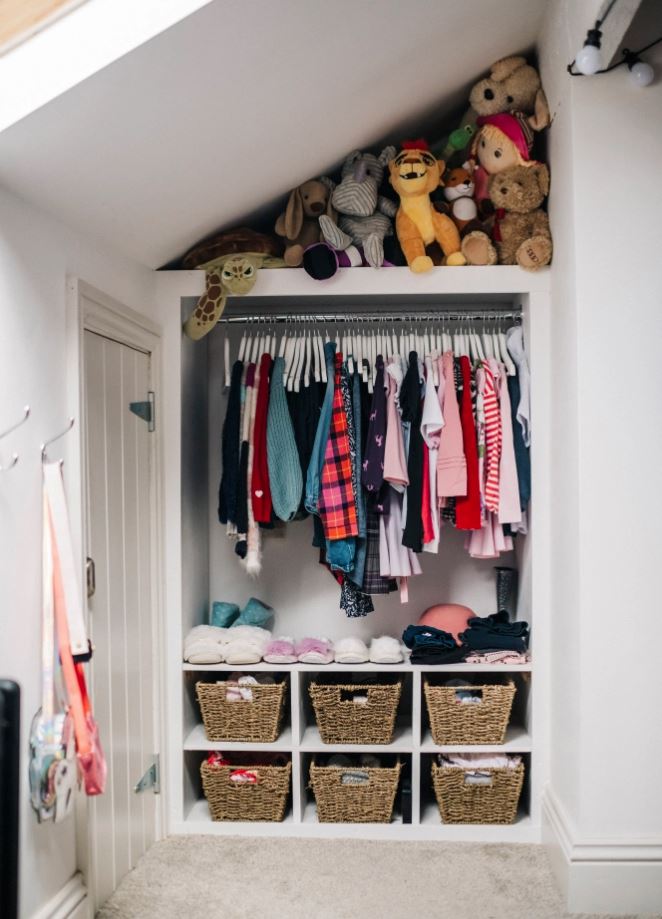
Stuff the Awkward Spaces
Figuring out how to best take advantage of your attic’s slanted ceiling feels like a particularly frustrating game of Tetris. But this clever attic closet storage idea fits the bill — and the slope.
Use your imagination to fit just the right storage items in this unusual space. Here, kids’ clothes and accessories are a perfect fit for this mini built-in, and soft stuffies fill the awkward top space.
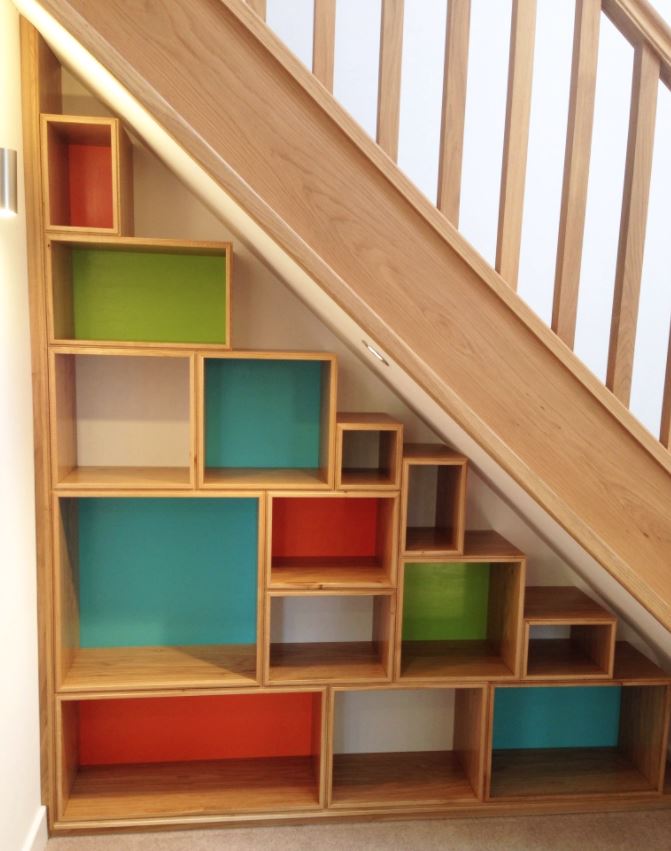
Other contenders for this angular cubby? Folded linens, spare throw pillows, or a creatively-stacked triangle of toilet paper. Go Modular Beneath the Stairs
That behind-the-stairs space can be tricky to fill: nothing quite fits right. But this ingenious modular basement under stair storage idea fits any sloped space, no matter the size. Use wooden crates or build your own stacking boxes to fit all your storage needs.
Paint the back of the boxes to add color and interest, or to clarify whose stuff goes where. Bonus: If your daughter knows the red-painted boxes are hers, she’ll be less likely to scatter stuff everywhere.
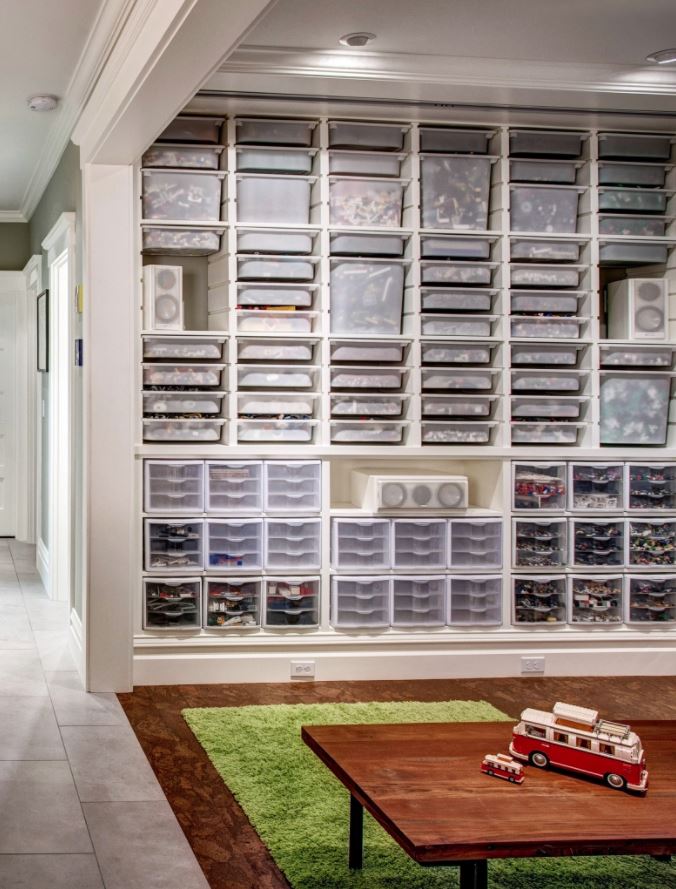
Push Pull-Out Storage to the Limit
This gorgeous built-in bookshelf is perfect for a large collection, like LEGO. The best part? The transparent plastic makes it easy to find exactly what you’re seeking, but still keep the space from feeling cluttered.
Visit HouseLogic.com for more articles like this. Reprinted from HouseLogic.com with permission of the NATIONAL ASSOCIATION OF REALTORS®.
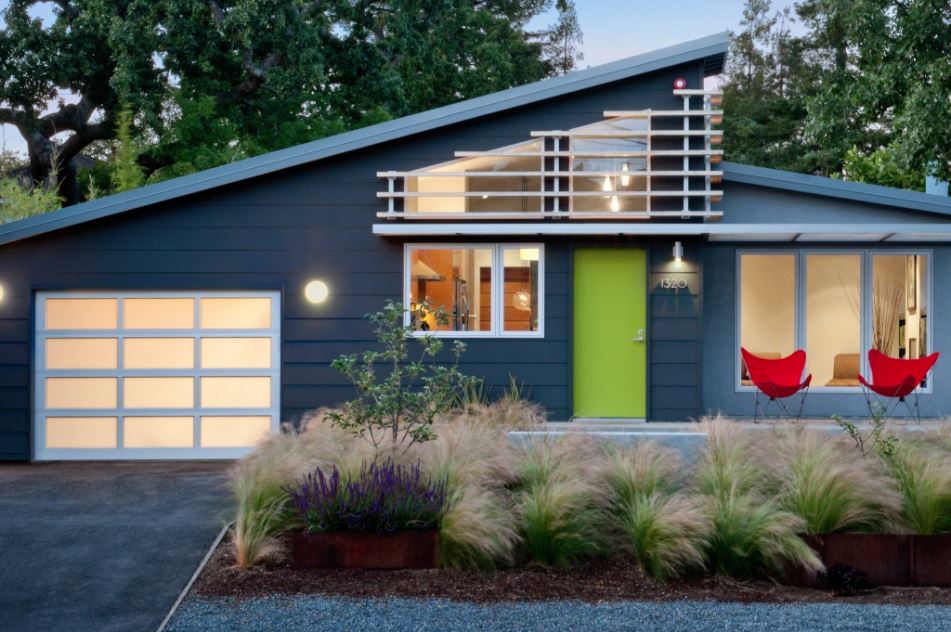
Hang around outdoor lighting designers long enough and you’ll hear a lot of talk about “moonlight effect.” That’s a naturalistic look that features light no more intense than that of a full moon, but still strong enough to make beautiful shadows and intense highlights on your home’s exterior. Here’s how to add outdoor lighting to your house:
7 Ways to Get That Warm Exterior Glow 1. Highlight trees. Whether illumined from below or given presence by a light mounted in the tree itself, trees make stunning features. 2. Use uplights. Uplighting is dramatic because we expect light to shine downward. Used in moderation, it’s a great way to highlight architectural and landscaping features. 3. Have a focus. The entryway is often center stage, a way of saying, “Welcome, this way in.” 4. Combine beauty and function. For example, adding lighting to plantings along a pathway breaks up the “runway” look of too many lights strung alongside a walk. 5. Vary the fixtures. While the workhorses are spots and floods, designers turn to a wide range of fixtures, area lights, step lights, and bollards or post lights. 6. Stick to warm light. A rainbow of colors is possible, but most designers avoid anything but warm white light, preferring to showcase the house and its landscape rather than create a light show. 7. Orchestrate. A timer, with confirmation from a photocell, brings the display to life as the sun sets. At midnight it shuts down everything but security lighting. Some homeowners even set the timer to light things up an hour or so before dawn.
How Outdoor Lighting Helps Security Soft, overall landscape lighting eliminates dark areas that might hide an intruder, exposing any movement on your property.
Overly bright lights actually have a negative effect, creating undesirable pockets of deep shadow.
The Best Outdoor Lights Designers Recommend Once disparaged for their high cost and cold, bluish glow, LEDs are now the light source of choice for lighting designers.
“They’ve come down in price and now have that warm light people love in incandescent bulbs,” says Paul Gosselin, owner of Night Scenes Landscape Lighting Professionals in Kingsland, Texas.
Although LED fixtures remain twice as expensive as incandescents, installation is simpler because they use low-voltage wiring.
Another advantage is long life. LEDs last at least 40,000 hours, or about 18 years of nighttime service. With that kind of longevity, “why should a fixture have only a two-year warranty?” asks Gosselin.
He advises buying only fixtures with a 15-year warranty — proof that the fixture’s housing is designed to live as long as the LED bulbs inside.
The Cost of Outdoor Lighting Total outdoor lighting costs will vary according to the size of your home and the complexity of your lighting scheme. Expect to pay about $100 to $200 per LED fixture including installation. LEDs also require a transformer; together, they’ll cost $300 to $500 with installation.
A motion detector security light costs an average of $300 to $400 each, with installation. Porch lights range from $65 to $200 including installation. Sconces range from $100 to $2,500 installed. Prices depend on the fixture and whether running new cable is necessary.
That kind of variation isn’t limited to porch lights and sconces. Outdoor lighting costs range considerably based on factors like square footage, DIY versus contractor installation, and high-end versus more ordinary fixtures. If you’re getting ready to add some glow to your yard, spend wisely and by considering:
Durability — Your outdoor fixtures will be exposed to the elements, so make sure they can hold up to extreme heat and cold, wind, and rain. Look for wet-rated fixtures, which can withstand harsh weather. The scale — Before you go shopping, measure the space you want to fill. Also, keep in mind that extra large fixtures can detract from the beauty you’re creating. Color and style — You’ll want your outdoor fixtures to complement your home’s exterior.
“Visit HouseLogic.com for more articles like this. Reprinted from HouseLogic.com with permission of the NATIONAL ASSOCIATION OF REALTORS®.”