Matching Room Color and Lighting to Get the Effect You Desire

Light changes color, so your lighting design — a top priority for any remodel — should help guide your color choices. Here’s how.

If you want to make your remodel project shine, finalize your lighting design before you select paint and carpet colors. The light you choose to illuminate tasks or set the mood will change the way you see color throughout the room. The Robin’s Egg Blue you picked could look like Paris at Sunset under some kinds of light.

It’s all determined by the way light and colors interact.

“People have to understand that the color of an object won’t look the same 24 hours a day,” says lighting designer Joseph Rey-Barreau. “I just had bamboo flooring installed throughout my house, and during the day it looks totally different than it looks at night.”

The way we “see” color primarily depends on two things:

1.  The light that an object absorbs. Black absorbs all colors; white absorbs none; blue absorbs red.

2.  How the light source works. Natural light (sunlight) changes throughout the day and is affected by a room’s location. Artificial light changes with the type of bulb you use.

How Sunlight Affects Colors

As the amount and angle of the sun changes, so will your room colors.

“Natural light should always be considered when choosing color for a space,” says Sarah Cole of the Farrow & Ball paint company.

North-facing rooms:
Light in these rooms is cool and bluish. Bolder colors show up better than muted colors; lighter colors will look subdued. “Use strong colors and embrace what nature has given,” says Cole.

South-facing rooms: Lots of high-in-the-sky light brings out the best in cool and warm colors. Dark colors will look brighter; lighter colors will virtually glow.

East-facing rooms: East light is warm and yellowy before noon, then turns bluer later in the day. These are great rooms for reds, oranges and yellows.

West-facing rooms: Evening light in these rooms is beautiful and warm, while scant morning light can produce shadows and make colors look dull.

How Light Bulbs Affect Color

The type of bulb you use can alter the colors in a room, too.

Incandescents: The warm, yellow-amber light of these bulbs will make reds, oranges, and yellows more vivid, while muting blues and greens.

Fluorescents: This flat and cool light enriches blues and greens.

Halogens: These white lights resemble natural light and make all colors look more vivid. Using halogens would make the shift from daylight to artificial light less jarring.

Compact fluorescent lights (CFLs): CFLs can produce either a warm white, neutral, or bluish-white light.

Light-emitting diodes (LEDs):
  You can buy warmer or cooler LEDs, and even “smart” LED bulbs whose color you can control wirelessly. “You can point to the color of the sky in a picture at sunset and make the light bulb in the house be that same color,” says Rey-Barreau.

Related: The Latest In Lighting Trends to Enhance Your Home

Tips for Achieving the Color You Want

  • Paint squares of primed drywall with samples of the colors you’re considering, and then move them around the room during the day. Apply at least two coats.
  • Evaluate samples of carpet during different daylight conditions.
  • Most contractors won’t hang lights before you paint, but you can get a color approximation by placing a bulb you’ll be using in a floor or desk lamp. If you’re hyper-sensitive to color or want a very specific look, ask your electrician to hang the lights, then cover them carefully during painting.
  • Remember that natural and artificial light will work together during certain times of day, especially in summer when dusk lasts a long time. Turn on artificial lights even during daylight to see what your colors will look like.
  • Paint sheen also affects color. Glossy finishes will reflect light and change the way the color looks, whereas flat finishes are less reflective and allow colors to look truer under bright light.
  • Light-colored walls can reflect the colors of bold carpets: A bright blue rug, for instance, can cast a bluish tone on a white wall.

Read more: http://www.houselogic.com/home-advice/painting/choosing-paint-colors-how-light-affects-color/#ixzz3Xc4l7rtE
Follow us: @HouseLogic on Twitter | HouseLogic on Facebook

Posted in Real Estate News | Comments Off on Matching Room Color and Lighting to Get the Effect You Desire

Distinctive Real Estate Statistics for 04-13-15

04-13-15 Weekly Real Estate Statistics

Posted in Real Estate News | Comments Off on Distinctive Real Estate Statistics for 04-13-15

Fun Easter Recipes for Kids!

Marshmallow Sheep Cupcakes

Servings: Serves 12

Ingredients

  • 1 1/2 cups all-purpose flour
  • 1 teaspoon baking powder
  • 1/2 teaspoon salt
  • 8 tablespoons (1 stick) unsalted butter , room temperature
  • 1 cup sugar
  • 3 large eggs
  • 1 1/2 teaspoons pure vanilla extract
  • 3/4 cup milk
  • 1 1/4 cup sugar
  • 5 large egg whites
  • 2 cups (4 sticks) unsalted butter , room temperature
  • 1 teaspoon vanilla extract

Directions

Cupcake: Heat oven to 350°. Line cupcake pan with liners; set aside. In medium bowl, sift together flour, baking powder, and salt. In bowl of electric mixer fitted with paddle attachment, cream butter and sugar until light and fluffy. Add eggs one at a time, scrape down bowl, and beat in vanilla. Add flour mixture and milk alternatively, beginning and ending with the flour. Divide batter evenly among liners, about three-quarters full each. Bake until golden and tops spring back to touch, about 20 minutes, rotating pan once if needed. Transfer to wire rack; cool completely. Buttercream Frosting: Combine sugar and egg whites in mixer bowl. Place over a pot of simmering water; whisk until hot and sugar is completely dissolved, 3 minutes. Transfer bowl to mixer stand. Using the whisk attachment, beat mixture on high until cooled, about 15 minutes. Using paddle attachment, add butter, 1 tablespoon at a time, until completely incorporated. Stir in vanilla. If not using immediately, refrigerate in airtight container up to a week, or freeze up to a month. Bring to room temperature, and re-beat or stir vigorously before using. (To make chocolate frosting, substitute 3 ounces semi-sweet chocolate, melted and cooled for the vanilla extract.) Makes 5 cups of frosting.

Assemble Marshmallow Sheep Cupcakes: Tint 1/4 cup buttercream pink and 1/4 cup black. Lightly frost cupcakes with uncolored buttercream. Use remainder to pipe heads and ears: starting in the center of cupcake pipe a pear-shaped head using a pastry bag fitted with just a coupler; increase pressure as you pull back. Pipe ears on both sides using a #352 Ateco leaf tip. Pipe black eyes and pale-pink mouth and nose onto narrow end of head using a #2 Ateco plain tip. Place three marshmallow halves on each sheep head, cut side down. Then, working from the base of the head out, continue to cover the cupcake with halved marshmallows, cut sides down.

Recipe: Easter Chicks Cupcakes

Servings: Serves 12

Ingredients

Cupcakes:

  • 1 box (1 lb 2.25 oz) yellow or devil’s food cake mix with pudding
  • Water, vegetable oil and eggs called for on cake mix box


Frosting and Decorations:

  • 2 1/2 cups shredded coconut
  • Yellow liquid food color
  • 1 container (1 lb) vanilla frosting
  • 48 brown miniature candy-coated chocolate baking bits
  • 24 small orange gumdrops


Directions

  1. Heat oven to 350°F (325°F for dark or nonstick pans). Place paper baking cup in each of 24 regular-size muffin cups. Make cake mix as directed on box, using water, oil and eggs. Divide batter among muffin cups. Bake 17 to 22 minutes or until toothpick inserted in centers comes out clean. Cool in pans 10 minutes; remove from pans to cooling racks. Cool completely, about 30 minutes.
  2. Place coconut in resealable food-storage plastic bag. Add about 8 drops yellow liquid food color; seal bag and shake to mix. Frost cupcakes with white frosting. Top with yellow coconut. For eyes, add brown baking bits. Cut orange gumdrops to resemble beaks; place on cupcakes.


Hidden Surprise Easter Egg Treats

Ingredients

  • 12 Plastic snap-apart 3 x 2-in Easter eggs
  • 3 tablespoons butter or margarine
  • 1 package (10 oz., about 40) JET-PUFFED Marshmallows
  • OR
  • 4 cups JET-PUFFED Miniature Marshmallows
  • 6 cups Kellogg’s® Rice Krispies® cereal
  • 1/2 cup M&M’S® Brand Chocolate Candies
  • Canned frosting or decorating gel (optional)

Directions

  1. Clean, then coat inside of plastic eggs with cooking spray. Set aside. 2. In large saucepan melt butter over low heat. Add JET-PUFFED Marshmallows and stir until completely melted. Remove from heat. 3. Add KELLOGG’S RICE KRISPIES cereal. Stir until well coated. 4. Using greased hands, firmly press 1/4 cup of the cereal mixture into each plastic egg half. Use fingers to make hollow center in each half. Remove from molds. Place on wax paper. Cool slightly. 5. Place about 6 M&M’S® Brand Chocolate Candies in one half of each egg. Gently press two halves of each egg together until they stick. Cool completely. 6. Decorate with frosting and additional M&M’S® Brand Chocolate Candies (if desired). Best if served the same day. MICROWAVE DIRECTIONS: Follow step 1 above. In microwave-safe bowl heat butter and marshmallows on HIGH for 3 minutes, stirring after 2 minutes. Stir until smooth. Follow steps 3 through 6 above. Microwave cooking times may vary. Notes: For best results, use fresh marshmallows. 1 jar (7 oz.) marshmallow crème can be substituted for marshmallows. Diet, reduced calorie or tub margarine is not recommended. Store no more than two days at room temperature in airtight container.


Simple Spring Baskets

15 min. prep time

2:15 total time

12 baskets

Ingredients

Baskets

2 cups miniature marshmallows1/4 cup Land O Lakes® Butter 1 (6-ounce) package (4 cups) chow mein noodles

Decorations

Colored licorice, cut into 5-inch lengths, if desiredVanilla-flavored candy coating (almond bark), melted, if desiredDecorator sugars, if desiredCoconut, tinted, if desiredPastel-colored chocolate candies or jelly beansDirectionsButter 12 muffin pan cups; set aside.

Combine marshmallows and butter in 3-quart saucepan. Cook over low heat, stirring occasionally, 6-8 minutes or until mixture is melted. Stir in noodles until very well coated

Press mixture evenly onto bottom and up sides of prepared muffin pan cups with buttered fingers. Immediately press licorice ends into each basket to form handle, if desired. Refrigerate at least 2 hours or until firm

Remove baskets from muffin pan cups. Decorate baskets with melted candy coating, decorator sugars and/or coconut as desired; fill with candy. Store in container with tight-fitting lid for up to 2 days.

Posted in Real Estate News | Comments Off on Fun Easter Recipes for Kids!

Distinctive Real Estate Statistics for 03-30-15

03-30-15 Weekly Real Estate Statistics

Posted in Real Estate News | Comments Off on Distinctive Real Estate Statistics for 03-30-15

Garage Organization Ideas for Under $50

By:

If clutter trumps cars in your garage, get organized (and make room for your vehicles) with these smart garage storage solutions, each costing less than $50.

Bikes, Skates, and Other Wheels

Bicycles, skateboards, scooters, and rollerblades — wheeled belongings can get underfoot and land you on your assets or bang up the car. Protect your paint job (not to mention your backside) with these wily storage solutions for your garage.

  • Hoist bicycles to the rafters with a rope-and-pulley system (starting around $40) that makes it easy to raise the bike and lock safely in place. When you’re ready to ride, release the lock and lower your bike to the garage floor. You’ll need an hour or two and basic tools to secure the pair of pulleys to ceiling joists and thread the ropes. (Similar hoists are available for kayaks or small boats; starting around $25.)
  • Avoid unintentional skateboard “tricks” with a specially designed wall rack that makes it easy for kids to hang up helmets and skateboards together; starting around $20. Secure this one to wall joists in less than an hour.
  • Keep scooters and bikes out of the way with tool hooks installed on a length of 1-by-6-inch lumber. You’ll pay $3 for each pair of vinyl-coated screw-in tool hooks and $1 per foot for lumber. You’ll need only an hour or two to secure the lumber to wall joists and screw the hooks into place along the board.

Sporting Goods

Active pursuits require a lot of gear that ends up in the garage. These organizers help tidy up all those sports balls, rackets, bats, gloves, clubs, fishing rods, and other outdoor fun-related goodies.

  • Bring together balls and bats on a convenient wire rack equipped with hangers that hold gloves too; starting around $35.
  • To keep your garage organization from going downhill, stash two pairs of snow skis, poles, and boots in one handy steel ski rack; $45. Securing this rack to wall studs helps it hold the weight of the equipment. If you can’t position it on studs, use wall anchors for a secure installation. You can do the task with or without anchors in an hour or two.
  • Make a port for your fishing rods by suspending two wire shelves from your garage ceiling about 5 feet apart, then threading the rods through the openings. Use shelves left over from a project or purchase a 4-foot-by-16-inch vinyl-coated wire shelf for less than $9, and saw it in half crosswise (or clip with bolt cutters) to make two 2-foot shelves. Snip additional wires where you need wider slots to accept pole handles or reels.

Tools

With a little imagination, you won’t need specially designed storage to organize your tools.

  • Conveniently hang wrenches and bungee cords using an ordinary vinyl-coated wire tie-and-belt rack, available at big box stores; $8.
  • Metal tools cling to a magnetized rail, keeping items in view and easy to retrieve; starting around $30. Simply screw the rail to wall studs to safely hold the weight of the tools (it’s an idea you may be drawn to.)
  • Cushion and protect tools by padding your toolbox drawers with a soft, non-slip liner. The open-weave design keeps moisture away and prevents tools from rolling around. Enough material to line eight average-size drawers is $15. Just cut the liner to length to fit and slip it into the drawer.
  • Organize small items — such as pencils, box cutters, and tape measures — by stashing them in electrical junction boxes; about $2 each (free if you have spares). Purchase a variety of sizes and shapes and secure them to studs or pegboard.

Yard and Garden Gear

Rakes, ladders, clippers, shovels, and sprays — a host of supplies keep your yard and garden looking lush and well-cared-for, but your garage? Not so much. Keep your garden and landscaping tools organized with these novel storage solutions.

  • Transform an old cabinet into a nifty garage storage unit on wheels. Hunt down an old four-drawer filing cabinet for a few dollars at a garage sale. Remove the drawers, turn it on its backside, and use a couple afternoons to apply paint and pegboard sides. Less than $25.
  • Hold heavy tools, long-handled implements, ladders, and more. Long steel rails with extruded holes mount high on the garage wall and secure to studs. Arrange a series of hooks and pegs on the rail to hang big tools. Two 48-inch rails sell for $22.
  • Secure a wooden pallet to wall studs to create a pocket for holding long-handled garden tools. To find free wooden pallets, check with local businesses as well as online classifieds, such as Craigslist. Cost: Free.
  • Keep bottles of fertilizers, repellants, and lubricants upright and easy to retrieve. A can rack ($15) prevents cans and bottles from tumbling off shelves.

Read more: http://www.houselogic.com/home-advice/garages/garage-organizers/#ixzz3Vu64hpSm
Follow us: @HouseLogic on Twitter | HouseLogic on Facebook

Posted in Real Estate News | Comments Off on Garage Organization Ideas for Under $50

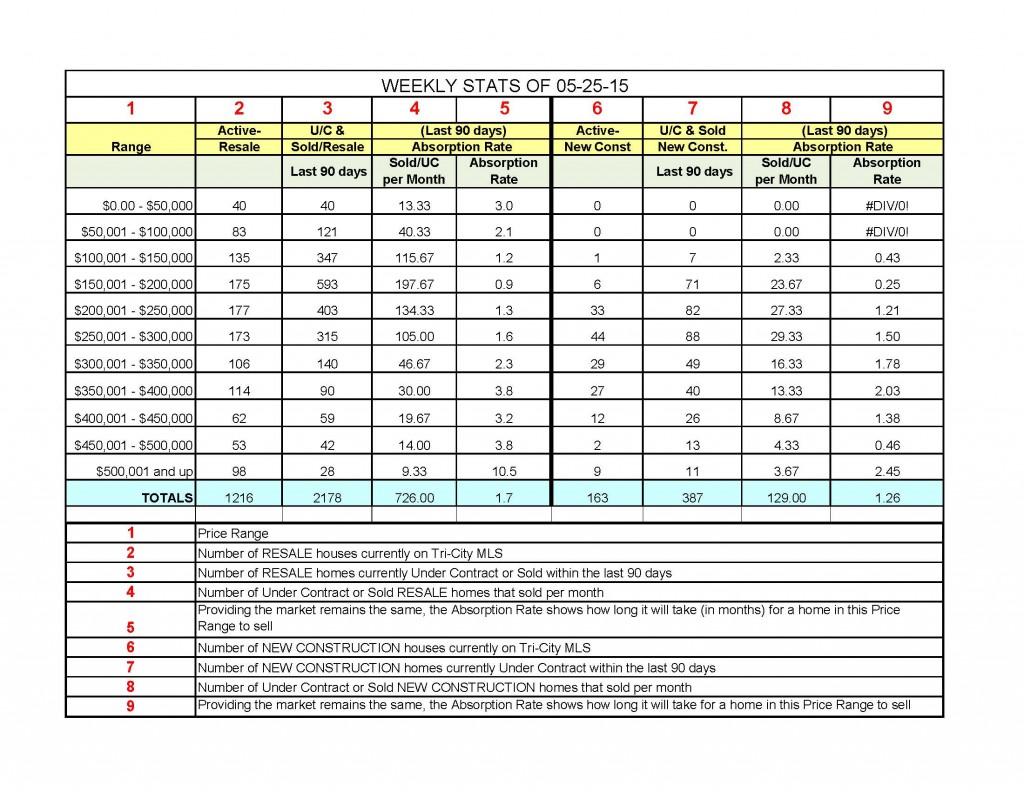
03-23-15 Weekly Real Estate Statistics

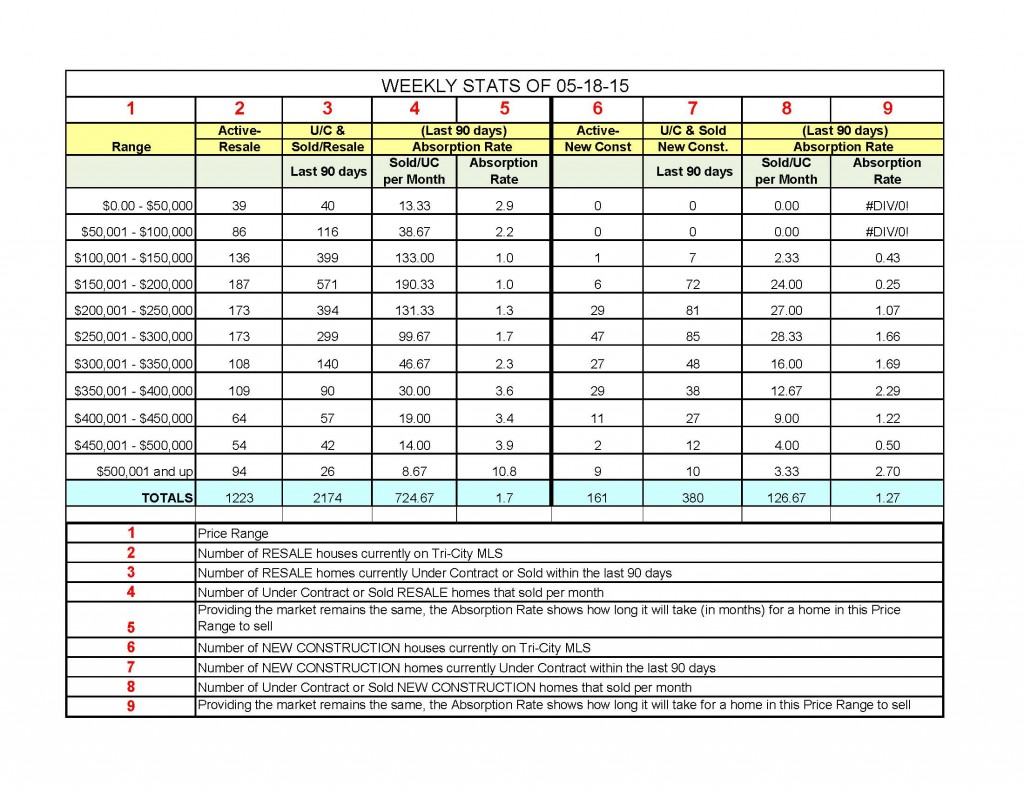
03-23-15 Weekly Real Estate Statistics

Posted in Real Estate News | Comments Off on 03-23-15 Weekly Real Estate Statistics

How to Organize Your Refrigerator

Leftovers gobbling up space in your refrigerator? Here are some tips for keeping things organized, efficient, and tasty.

A well-organized refrigerator keeps food fresh longer and lets you grab and go faster. Before you unpack groceries, spend a second thinking about the right place for everything.

Here are common sense ways to declutter and organize your fridge:

1.  The front of the middle rack, near eye-level, is prime refrigerator real estate. Put priority items there, like leftovers you want eaten soon and healthy snacks. The back of the fridge is the coldest part. Store milk there, and it will stay fresh longer.

2.  Don’t waste fridge space on food that doesn’t need to be chilled. Examples: fresh eggs from backyard chickens (though store-bought eggs do need refrigerating), ketchup, vinegar, jam, mayonnaise, and butter. Put those items in the pantry. You can store fresh eggs in a bowl on the counter for eight weeks.

3.  Never put tomatoes in fridge, or they’ll get mushy; onions will soften; honey will thicken; potatoes will turn too starchy. Keep onions and potatoes in separate paper bags and store in a cool, dark place (a lower cabinet drawer is great).

4.  Rectangular or square bins are your friends (round ones waste space, so don’t use them). Designate one for healthy snacks and another for breakfast foods like bagels and cream cheese. In the freezer, use one big bin for frozen veggies, rather than stuff individual bags into the freezer.

5.  Use plastic placemats as shelf liners, which makes cleanup easier.

6.  Place drippy food, like red meat and seafood, on the bottom shelf. That way it won’t drip too far.

Read more: http://www.houselogic.com/home-advice/appliances/how-to-organize-refrigerator/#ixzz3UyKNWabs
Follow us: @HouseLogic on Twitter | HouseLogic on Facebook

Posted in Real Estate News | Comments Off on How to Organize Your Refrigerator

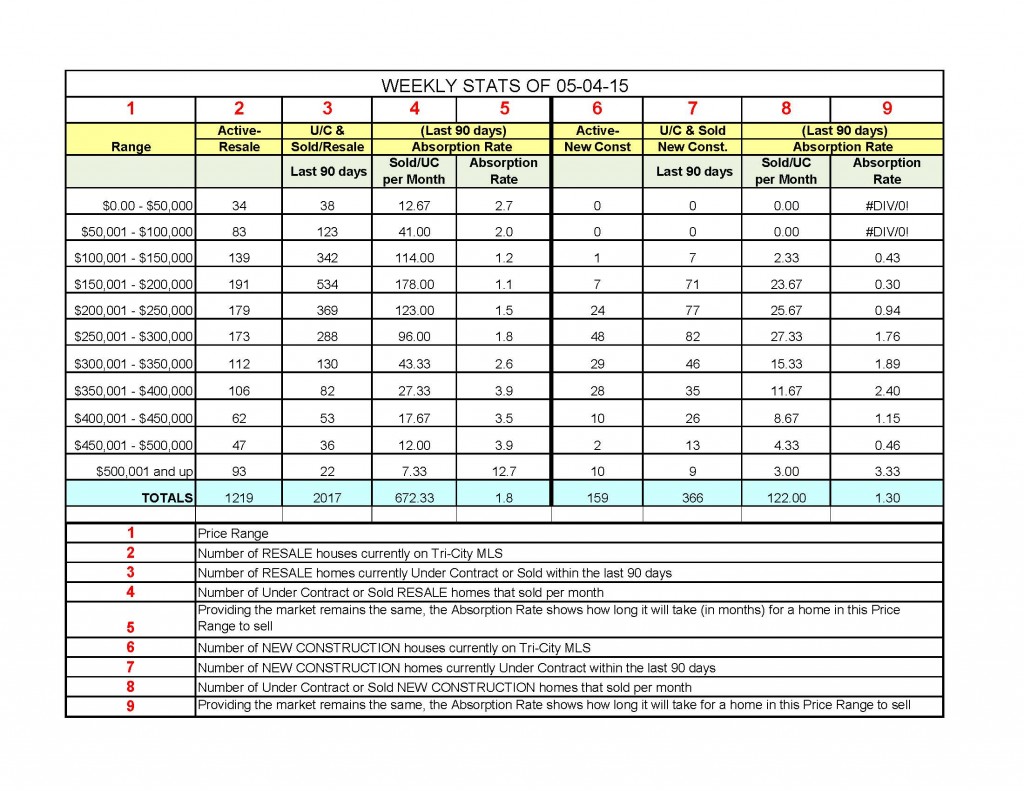
03-16-15 Weekly Real Estate Statistics

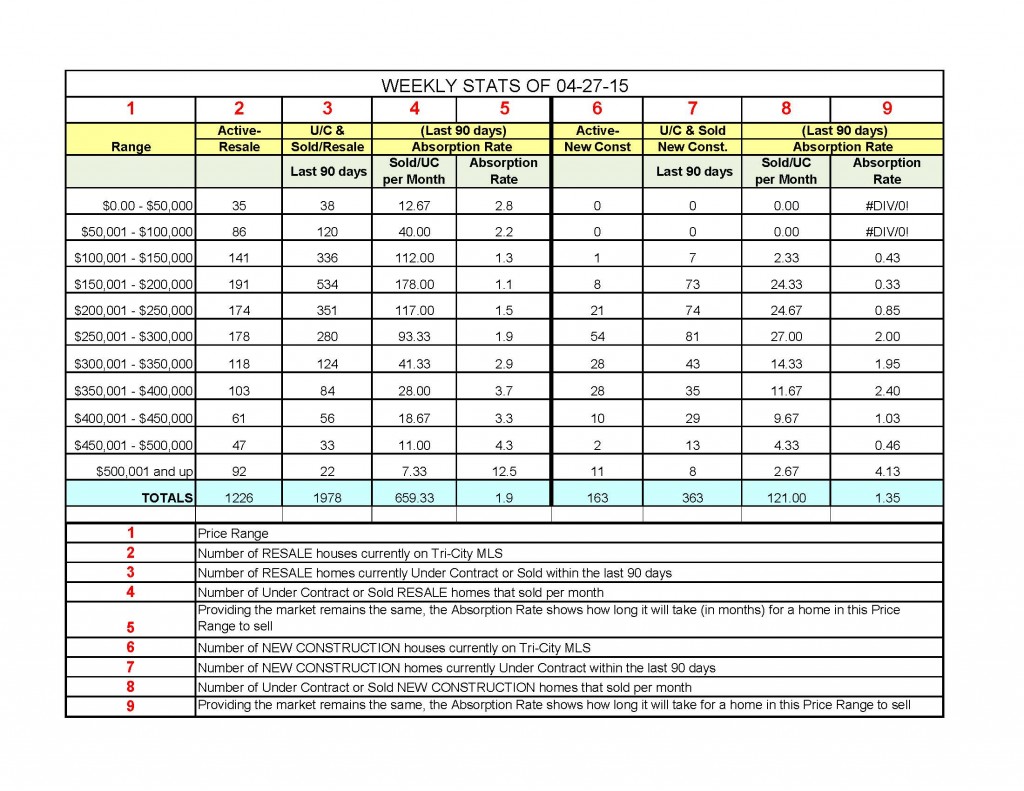
03-16-15 Weekly Real Estate Statistics

Posted in Real Estate News | Comments Off on 03-16-15 Weekly Real Estate Statistics

Small Home Storage: Maximize Your Storage Space

By: Terry Sheridan

Your small home has more storage space than you think. For relatively little money but a lot of common sense and ingenuity, there’s space to be found.

Finding storage space in a small home doesn’t require remodeling or room additions. Start by getting rid of accumulated stuff. Take a hard look at room space, and buy furniture and storage items that can do double duty.

Here are six tips to maximize storage that won’t empty your savings account:

1.  Declutter. It’s the first thing architect Sarah Susanka of “Not So Big House” tells clients who talk of expanding their homes. Haven’t used something for a couple of years? Pitch it, she says. You’ll be amazed at how much space opens up when you do.

Cost: $0

2.  Platform and bunk beds. Add space and eliminate a dresser in a small bedroom with a three-drawer or six-drawer platform bed. Find one at a furniture or big department store, and online.

Cost: $225 to $600 and up, queen size

Bunk beds won’t have drawers, but you’ll save space by stacking beds. And kids love ‘em. They come in a variety of styles and configurations. Some will convert to two twin beds.

Cost: $180 to $400 and up

3.  Shoe organizers. They’re for so much more than just shoes. Hang one in a kitchen closet or pantry, and use it as your small home catch-all for remotes, keys, notepads, cell phones, and chargers, and other household essentials. It’ll free up a kitchen drawer or two for other uses.

Cost: Less than $20

4.  Toe-kick storage. The space under your kitchen cabinets is a treasure trove of storage possibilities. Put placemats, napkins, cookie sheets, and how-to manuals there. Hire a cabinet-maker to install them, or request them as a custom feature in a new-cabinet order.

Cost: About $300 per drawer

5.  Floor-to-ceiling storage. Furniture-style 6-foot-tall bookcases don’t use all available wall space. But extend shelving that extra two feet to the ceiling, and you’ve got room for a lot more books, knickknacks, or art objects. Home improvement stores have brackets and shelves in a variety of colors and sizes to match your décor.

Cost: Under $200, depending on the space size

Read more: http://members.houselogic.com/articles/small-home-storage-maximize-your-storage-space/preview/#ixzz3UJ0XlTWd
Follow us: @HouseLogic on Twitter | HouseLogic on Facebook

Posted in Real Estate News | Comments Off on Small Home Storage: Maximize Your Storage Space