Recognize the first signs because fixing water damage early can prevent extreme trouble, like mold, and smooth the repair process.

Burst pipes. Ice dams. Leaking toilets. Broken refrigerator icemaker. Water can infiltrate your cozy, warm, and dry home in so many ways that it’s no wonder about one in 60 insured homes has a property damage claim for water damage repair.
If you can clean up water damage immediately, you’ll be in much better shape to prevent further damage. Taking the right steps will help you restore your home and your sanity.
Addressing Water Damage: A Step-by-Step Guide
Water can be sneaky and may not announce itself dramatically — with a burst pipe, for example. “People don’t notice things until it’s a bad situation,” says Taylor Freeman, lead foreman for Brothers on The Side, which handles plumbing emergencies and does renovations and remodels in Dallas, Georgia. He recommends checking your ceiling for stains, looking under your sink for puddles, and examining pipes for cracks.
“Keep your eyes open and find a small problem while it’s still a small problem.”
Taylor Freeman
This early intervention will not only prevent more water damage, but also results in a smoother repair process. First, assess the damage. For example, if you see a water stain on the ceiling, “draw with a pencil around the stain and look at it again in a few hours or the next day to see if it’s grown. If it’s getting wetter or you’re talking about a large area, it could be a leak in a water line.” That’s when you’d call a plumber for help. Untreated leaks can lead to structural or electrical damage. “If you know the spot only gets wet after rain, it could be a drain line and isn’t near as much of an emergency.”
If you have standing water, clean up the water damage right away and follow these steps:
- Find the source of the leak.
- Turn off the water supplying that area.
- Use towels, fans, a shop vac, or whatever you can, to dry the area.
- Repair any damage.
In addition, take photos or videos, “even before you do any temporary repairs, and afterward, keep all your receipts,” says Janet Ruiz, director of strategic communication at the Insurance Information Institute. “Doing temporary repairs right away can help you to avoid mold.”
#1 Shut Off Water and Electricity
If you find a leak, turn off the nearest water supply. A leak behind an electrical outlet or near something electrical requires you to turn off the electricity. And you should turn off the main water valve if the leak is larger or you see standing water. “This main valve is typically inside the house, likely in your basement or garage, pretty close to the water heater,” says Freeman, who tags the main valve for his clients because many people don’t know where it’s located. And don’t wade into standing water in the basement; you an electric current could seriously injure you. Turn off the power and call an electrician.
#2 Move Valuable Items and Appliances to Safety
If you have a basement, ground water could be seeping in there. Your water heater might also be in the basement. And your kitchen is likely on the main level. While you may not know if your home is prone to water infiltration, it’s a good idea to store your valuables in the upper regions of your home just in case.
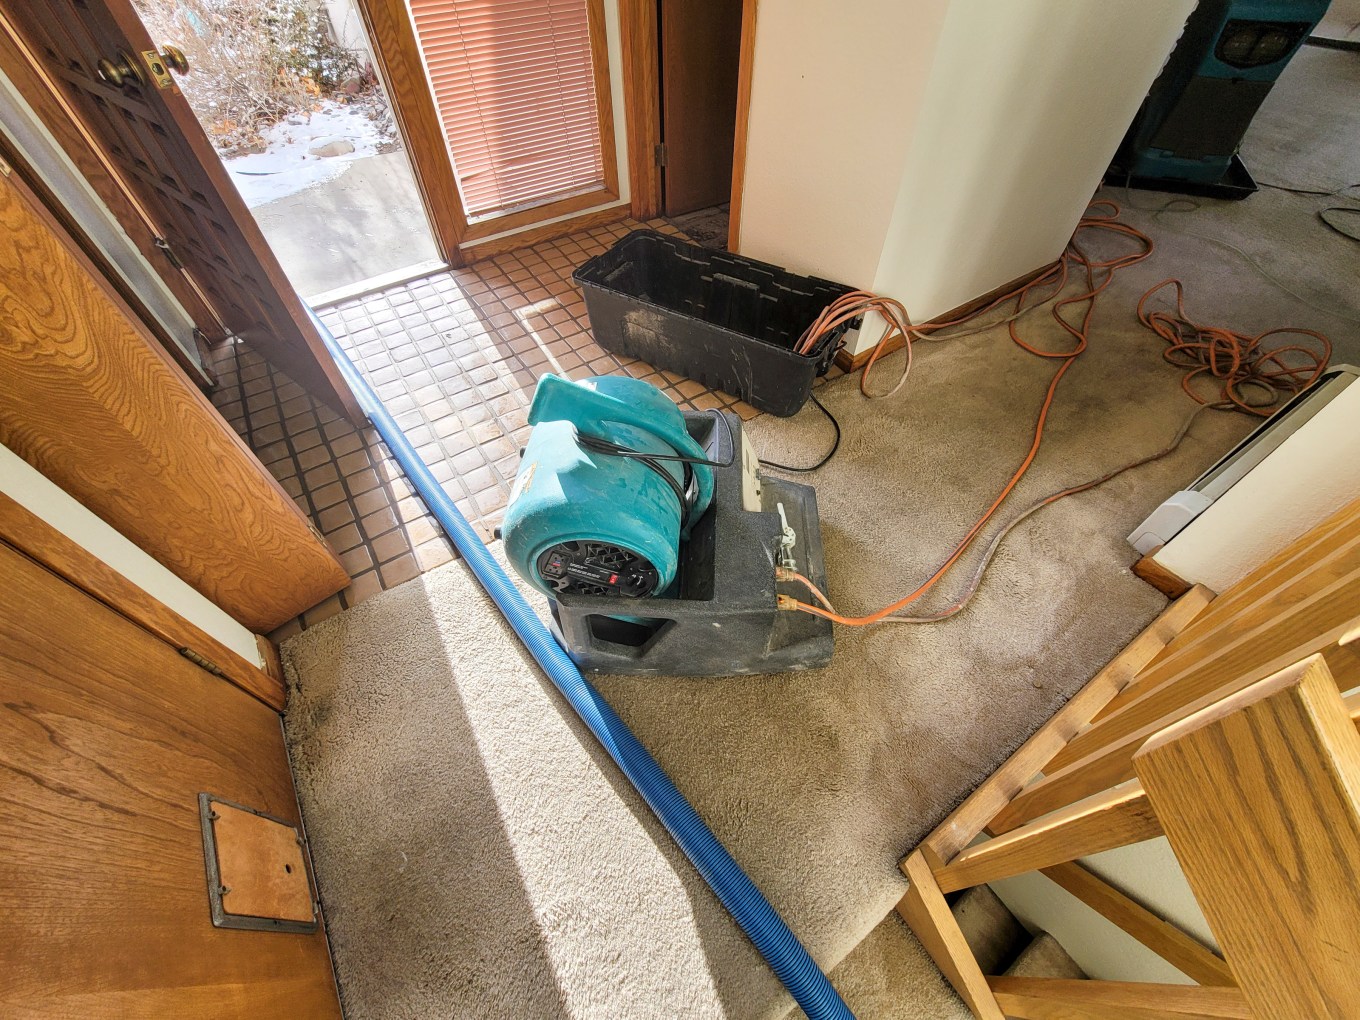
#3 Remove Standing Water
However you decide to start water damage repair — via a shop vac, buckets, or towels — you want to do it safely. As mentioned previously, turn off the power. Wear safety goggles, work gloves, long sleeves, and high rubber boots. Put a mask over your mouth and nose to avoid inhaling mold or bacteria.
If you’re up against a high-risk or extreme situation, it’s probably time to contact your insurer, who will direct you to a professional mitigator. Once they take care of the immediate problem, call a plumber to find the source and stop the leak. (See the list of the categories of water damage repair, below.)
#4 Evaluate the Extent of the Damage
Once you’re able, inspect your home or apartment — particularly your basement floor and walls, bathroom walls, crawlspaces, areas near plumbing, and air ducts — for stains, dampness, and mold.
A moisture meter can help you detect concealed moisture (even behind walls) and possible spots of mold, says Ian Giammanco, lead research meteorologist for the Insurance Institute for Business and Home Safety, who holds a doctorate in wind science and engineering . You can find a moisture meter easily online and at big box stores.
Remember to document any damage with photos and notes for your insurance company. If you’re not sure you should call in a professional, consider this list of classes of water damage:
- Class 1: Involves minor damage affecting a small area with limited moisture. There’s minimal, less than 5%, water absorption. You can likely DIY some quick drying and basic cleaning.
- Class 2: There’s a lot more water on the scene, and you may have wet carpeting and some wicking up the walls. You’ll need to do more-extensive drying and cleaning.
- Class 3: Now you’re talking about the highest volume of water that’s taking its sweet time evaporating. Maybe your sprinkler system malfunctioned or your water supply line failed. Definitely call in a professional to do comprehensive mitigation and restoration.
- Class 4: It seems that everything, everywhere has sucked up and trapped water, including low-permeability materials like concrete. You’ve likely got extensive damage. You’ll need the big guns who can do water damage repair using specialized equipment for effective restoration.
#5 Dry and Clean Up
You may feel like throwing in the towel — and now’s the time to do it. But that may not be enough. Get out the dehumidifier (or rent one) to suck up the moisture and fans to move the air around to thoroughly dry all the affected areas. Drying out your place makes it more difficult for mold to grow.
Once your space is dry enough, it’s time to clean. Remember that when you’re cleaning and disinfecting, you need proper ventilation. Consider hiring professionals if mold is severe.
- Hard surfaces: Clean first with water and detergent, then use a disinfectant or sanitizer. Bleach and other disinfectants and sanitizers can kill microorganisms. But they don’t work well unless you first clean up the dirt around the microorganisms, according to the Environmental Protection Agency.
- Carpets and upholstery: You can determine whether to toss everything or try to salvage these items if you know what caused the damage: clean water, gray water (full of chemicals from something like a dishwasher), or black water (from sewage). You have to dry water-damaged areas within 24 to 48 hours to prevent mold growth, according to the EPA. If the damage is minimal, consider a professional cleaning service to remove water and help prevent mold growth between fibers.
- Furniture: You can clean hard, nonporous furniture (glass and metal) with soap and water. Clean leather with a mix of equal parts denatured alcohol and water. (Test first on a small area.) With fabrics and pillows or damaged wood, consider calling a professional restoration company.
- Walls and ceilings: If the water has only minimally affected these areas, you can wash with detergent and water before using a good disinfectant (about one cup of chlorine bleach to one gallon of water) to prevent mildew buildup.
#6 Repair and Restore Your Home
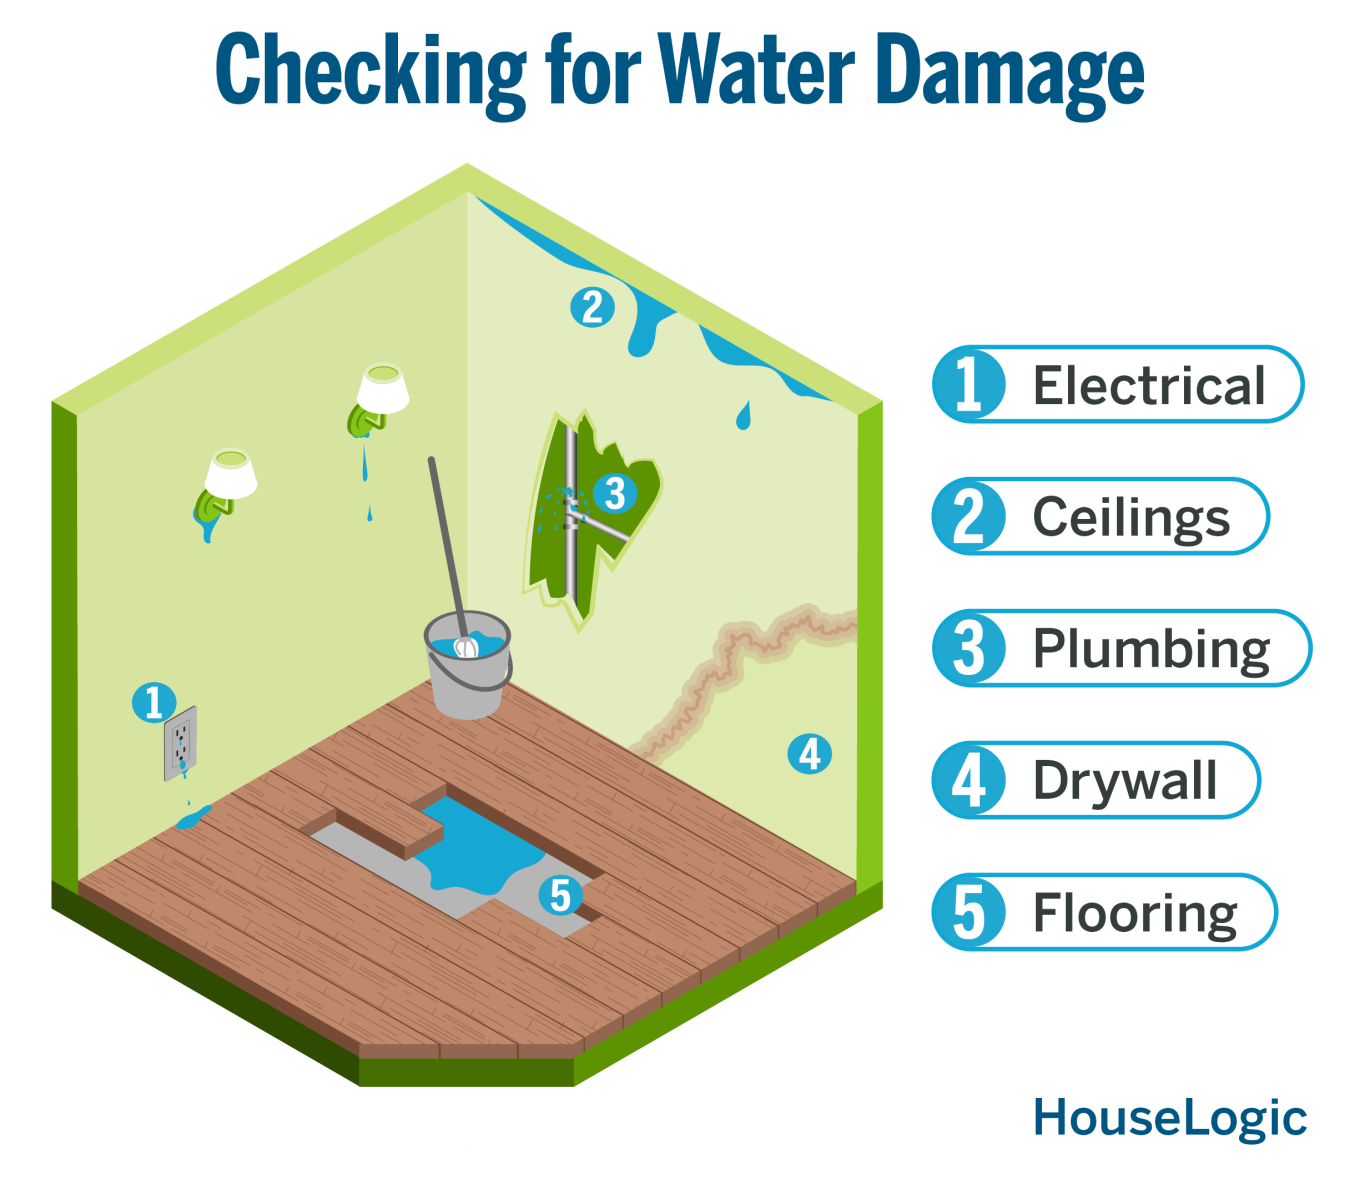
The bad news is that with water damage, you’ll likely need to have some structural repairs made. But there’s a positive side, Giammanco says. “If you have to gut the drywall after water damage, when the structure of the home is opened up, you have an opportunity to improve some of the structural features.” Those include the roof-to-wall and wall-to-foundation connections — spots where water may seep in.
- Drywall: This is an organic, porous material and a veritable smorgasbord for mold. You will likely have to cut sections away or replace entire walls.
- Flooring: Repair or replace flooring based on how severe the damage is. Hardwood may need sanding or replacement, while tile and vinyl could require reinstallation.
- Ceilings: Repair or replace damaged ceiling panels or tiles, and check for underlying structural issues.
- Electrical: Inspect wiring, outlets, and fixtures for damage. To ensure safety, a licensed electrician should always handle electrical repairs.
- Plumbing: Check for leaks or damage in pipes and fixtures. A professional plumber should make major plumbing repairs.
Don’t fret that you’ll need a professional for everything. You can likely DIY minor drywall fixes or flooring touch-ups. But for anything that might be dangerous or cause you to think you’d be in over your head, get help.
Safeguard Your Home with Effective Water Damage Repair
The best protection against water damage is prevention. Stay vigilant for ongoing problems and set a regular maintenance schedule for cleaning gutters, inspecting pipes for cracks and leaks, and getting plumbing inspections to prevent future water damage repairs.
Ultimately, prevention measures will make it easier to repair your home if water damage occurs. They will also help you maintain your safety and your home’s value.
Water Damage Repair FAQs for Homeowners
How can you prevent future water damage?
Along with routine inspections and proper maintenance of plumbing and roofing, consider installing a sump pump to reduce the risk of water damage. A sump pump doesn’t let the water level rise too high and removes the water, sending it away from your house. It’s usually located in the basement.
You might also invest in a water leak detection kit, which monitors the flow of water and helps you locate a leak in your plumbing. There are smart versions that alert you of a leak. Some versions even have an automatic shutoff. “It’s a great investment and not typically expensive,” Freeman says. “But even if it [costs] a thousand dollars, it’s worth the money. If a pipe bursts and you don’t turn off the water, you’re looking at possibly tens of thousands of dollars of damage.”
Don’t forget the exterior. “Pay attention to how water flows around your home. A French drain, or other drainage system, especially near a retaining wall will help water flow away from design features,” Giammanco says. “And design landscaping to drain water away from the foundation.” That will reduce the risk of future water damage, he adds.
Does Homeowners Insurance Cover Water Damage?
“Water damage is the most common and costly disaster that people experience with their home. It costs billions of dollars annually,” Ruiz says. Different types of policies cover different types of water damage. Basically, “water coming from the ground up is considered flooding and is not covered by your homeowner’s policy.” You’d need to have purchased flood insurance to cover that. “There’s also sewer and drain backup coverage that you can purchase in addition to your homeowner’s insurance.” That can cover an accident that causes sewers and drains to back up.
Typically, a homeowner’s policy covers water damage caused by “water from above coming into the house and causing damage,” Ruiz says. Think a hurricane blowing off your roof and rain getting in. Also policies cover burst pipes and damage from ice dams during winter storms.
The bottom line is that your homeowner’s policy covers direct physical accidents, not situations that are maintenance issues. Review your policy with your insurance provider to determine your coverage. But don’t wait until you’ve got water damage to do so.
What Should You Not Do After Water Damage?
If you need water damage repair, don’t delay. Make sure to do temporary repairs right away to avoid mold, Ruiz cautions. You don’t want to incur further damage or health risks.
And of course, take precautions for your own and your family’s safety. If electricity is involved, call in a professional.
“Visit HouseLogic.com for more articles like this. Reprinted from HouseLogic.com with permission of the NATIONAL ASSOCIATION OR REALTORS®.”